Come celebrate with us, get signed cookbooks, have some matcha cake and tea, and shop for delicious ingredients and gorgeous cookware and dishware at my favorite shop in the neighborhood. (Along with their sister store Honoki, just around the corner – where I bought many of the props and ingredients for photographing the recipes in the cookbook!)
Packaged udon noodles are usually available at well-stocked Asian grocery stores and often in the international section of large supermarkets. In most cases, they’re just fine for cooking up a quick Japanese meal. Quality, texture, and taste can vary – but in my experience, even inexpensive, imported packaged udon noodles are enjoyable. You can also find dried udon noodles and boil them, but they’re never as thick, soft, and chewy.
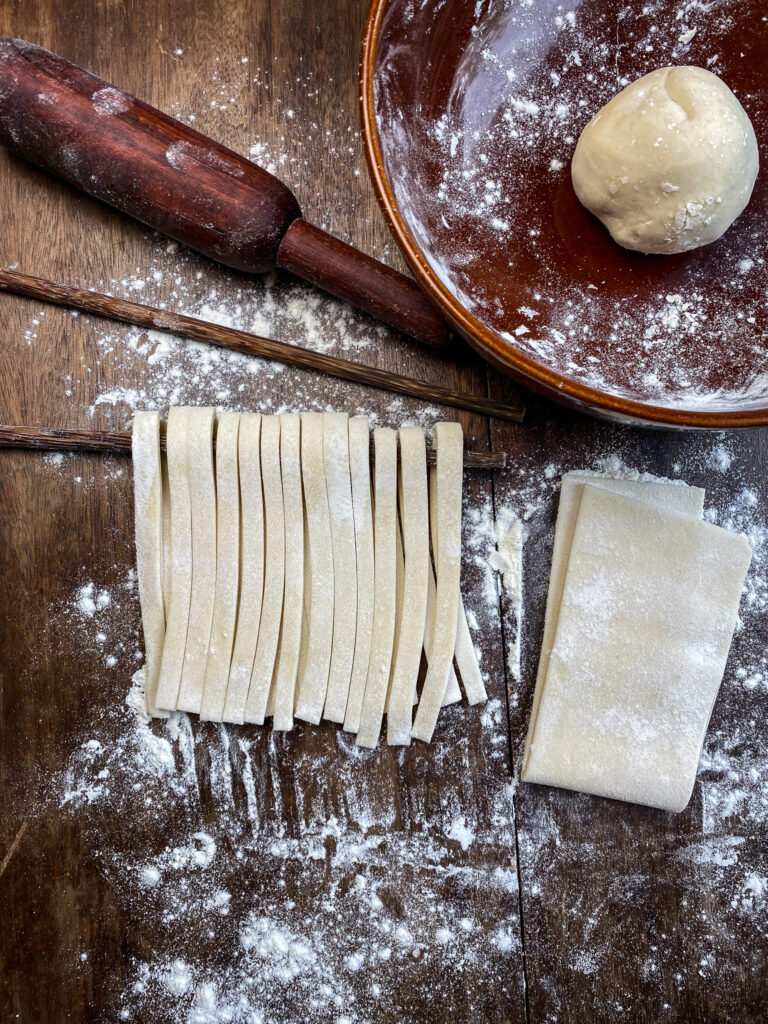
Making your own fresh noodles is always superior in taste. It’s also fun – especially with kids – and only requires three ingredients you can find anywhere: flour, salt, and water.
This method and recipe is adapted from an udon workshop my friend Naoko attended in Japan. I had the chance to join a workshop myself in Takamatsu last year, but somehow there just wasn’t time – between local exploring, royal garden visits, temple treks, and cooking at the apartment. And to be honest, the fresh udon noodles in Japanese supermarkets are just so tempting, convenient, and delicious. I found myself cooking with them again and again – not only in Shikoku’s udon capital, but all across Japan.
I’ve made udon noodles with this recipe many times at home here in Berlin, and the results are always satisfying. As noted in the recipe, you can knead the dough with your hands – or more traditionally, with your feet!
Getting the dough texture just right, tweaking the water-to-flour ratio slightly, and cutting decent-looking noodles takes a bit of practice. (My first attempts were far from attractive!) Fortunately, even the sloppiest noodles still taste great – and making them is always a rewarding experience.
Try cooking up a batch of fresh udon noodles and use them for Kake Udon, Yaki Udon, or Boro Udon – all recipes featured in my new JAPAN cookbook and e-book.
Udon homemade thick wheat noodles
makes 4 portions (ea. 7 oz / 200 g) cooked noodles / time 45 min +
4 cups (520 g) flour (all-purpose / type 405) more as needed
1 cup (240 ml) warm water
1 tsp (5 g) sea salt
Add flour to a large mixing bowl.
Stir warm water and salt until it dissolves in a mixing cup.
Add salt water to flour in 4 to 5 portions, stirring with two chopsticks held together. Knead with your hands about 5 min, adding slightly more flour if the dough is too sticky.
Put the kneaded dough ball into a large sealable bag. Knead on the floor with your heels for 15–20 min until soft and rubbery. Alternatively, knead the dough with your hands on a floured surface for 15–20 min.
Seal the bag and let the dough rise for 1–2 hrs in a warm place.
Dust a clean working surface (e.g. countertop or cutting board) with flour.
Separate dough into two balls. Roll out a dough ball to a long rectangle about 1/4 in (5–6 mm) thick.
Generously dust the flattened rectangle with flour and fold it over onto itself once or twice.
Cut through the two or three layers with a large, sharp knife in thin strips 1/4 (5–6 mm) wide, the same thickness as the height of a dough layer.
Repeat for second dough ball, or store it in a sealable container in the fridge (up to 5 days) for another batch of fresh udon noodles later.
Carefully separate the cut noodles, drape them over a chopstick, shake excess flour off, and hang them over a large bowl.
Bring a large pot of water to a rapid boil on high heat.
Add cut noodles to rapidly boiling water and cook until al dente, about 7–10 min.
Drain cooked udon noodles with a colander. Rinse briefly with running cold water. Drain well. Transfer noodles to a bowl and cover.
Use for Kake Udon (page 181), Yaki Udon (page 183), and Boro Udon (page 191).
Warmes Wasser und Salz in einem Messbecher verrühren, bis es sich auflöst.
Nach und nach das Salzwasser zum Mehl geben und es mit zwei zusammengehaltenen Stäbchen unterrühren. Mit den Händen etwa 5 Min. kneten, dabei etwas mehr Mehl hinzufügen, falls der Teig zu klebrig ist.
Teigkugel in einen großen verschließbaren Plastikbeutel geben. Auf dem Boden mit den Fersen 15 bis 20 Min. durchkneten, bis der Teig weich und elastisch wird. Alternativ den Teig mit den Händen auf einer bemehlten Oberfläche 15 bis 20 Min. kneten.
Beutel verschließen und den Teig 1 bis 2 Stunden an einem warmen Ort ruhen lassen.
Eine saubere Arbeitsfläche (z.B. Tischplatte oder großes Schneidebrett) mit Mehl bestäuben.
Den Teig in zwei Kugeln teilen. Eine Teigkugel zu einem langen Rechteck mit einer Dicke von 5–6 mm ausrollen.
Das ausgerollte Rechteck großzügig mit Mehl bestäuben und den Teig ein- oder zweimal übereinander schlagen.
Die zwei oder drei Teigschichten mit einem großen, scharfen Messer in dünne, 5–6 mm breite Streifen schneiden, etwa die gleiche Dicke wie eine Teigschicht.
Den Vorgang mit der zweiten Teigkugel wiederholen – oder den Teig in einem verschließbaren Behälter im Kühlschrank aufbewahren (bis zu 5 Tage), um später eine weitere Runde frischer Udon-Nudeln zuzubereiten.
Die geschnittenen Nudeln vorsichtig voneinander trennen, über ein Stäbchen fädeln, überschüssiges Mehl abschütteln und die Nudeln über eine große Schüssel hängen.
Einen großen Topf mit Wasser auf hoher Flamme zum Kochen bringen.
Geschnittene Nudeln in das sprudelnd kochende Wasser geben und 7 bis 10 Min. bissfest garen.
Gekochte Udon-Nudeln in einem Sieb mit kaltem Wasser abspülen. Gut abtropfen lassen. Nudeln in eine Schüssel geben und abdecken.
Für Kake Udon (Seite 181), Yaki Udon (Seite 183) und Boro Udon (Seite 191) verwenden.
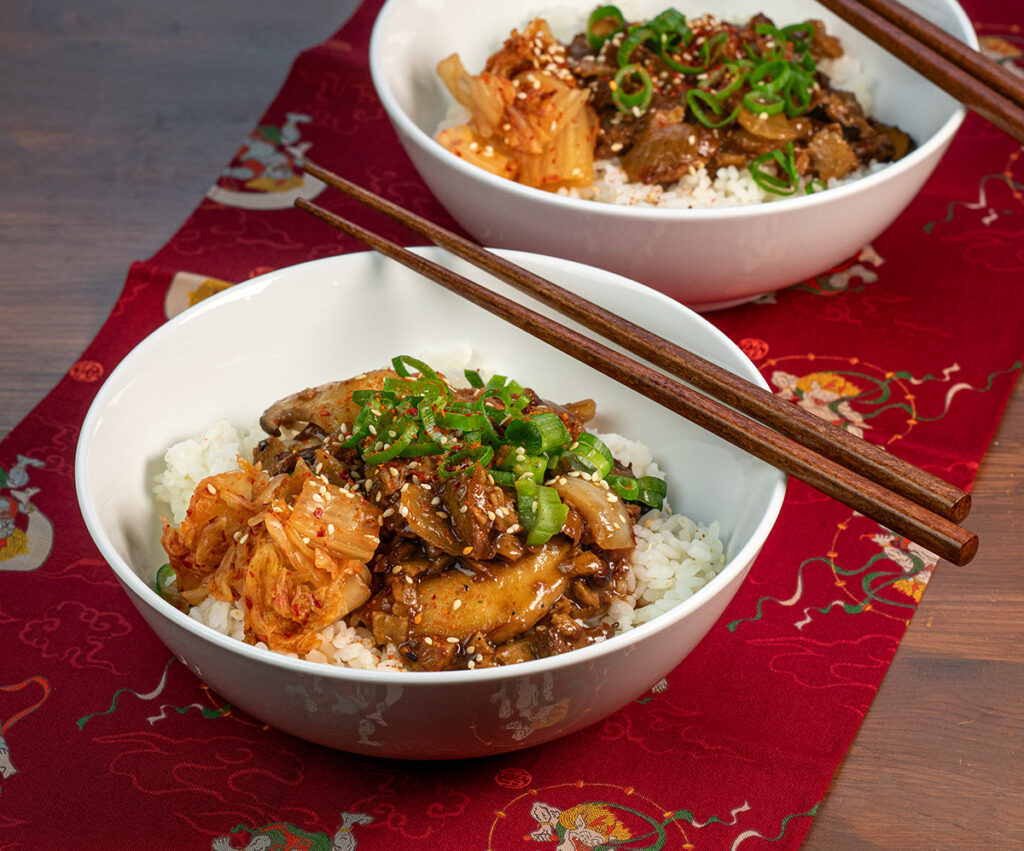
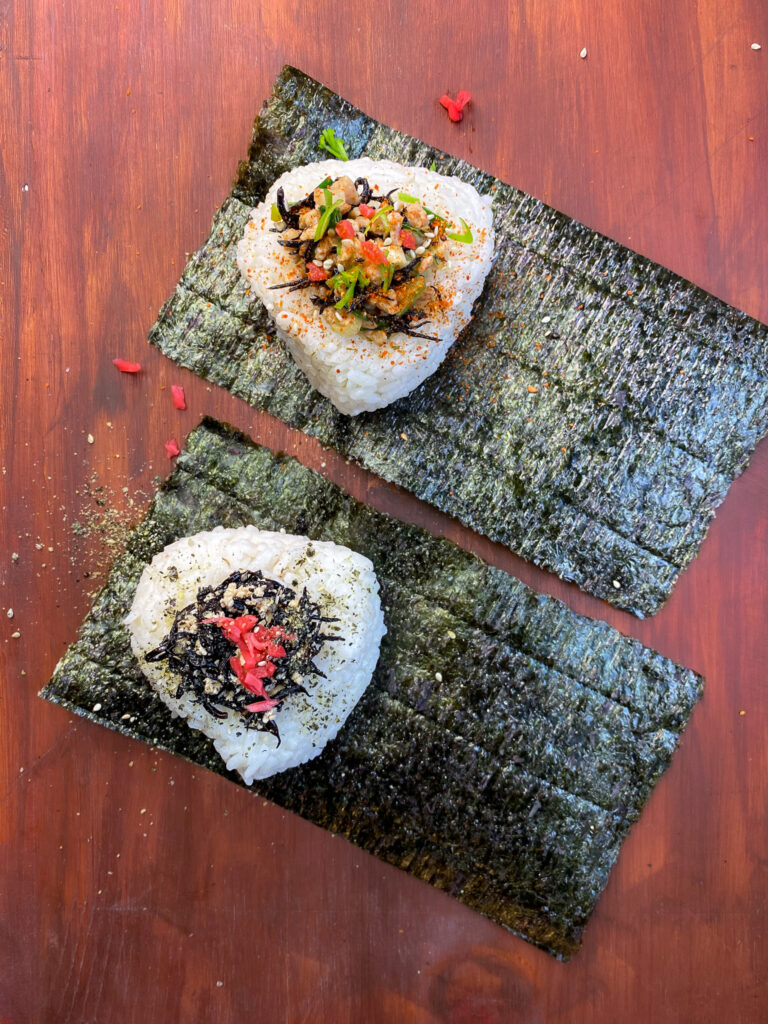
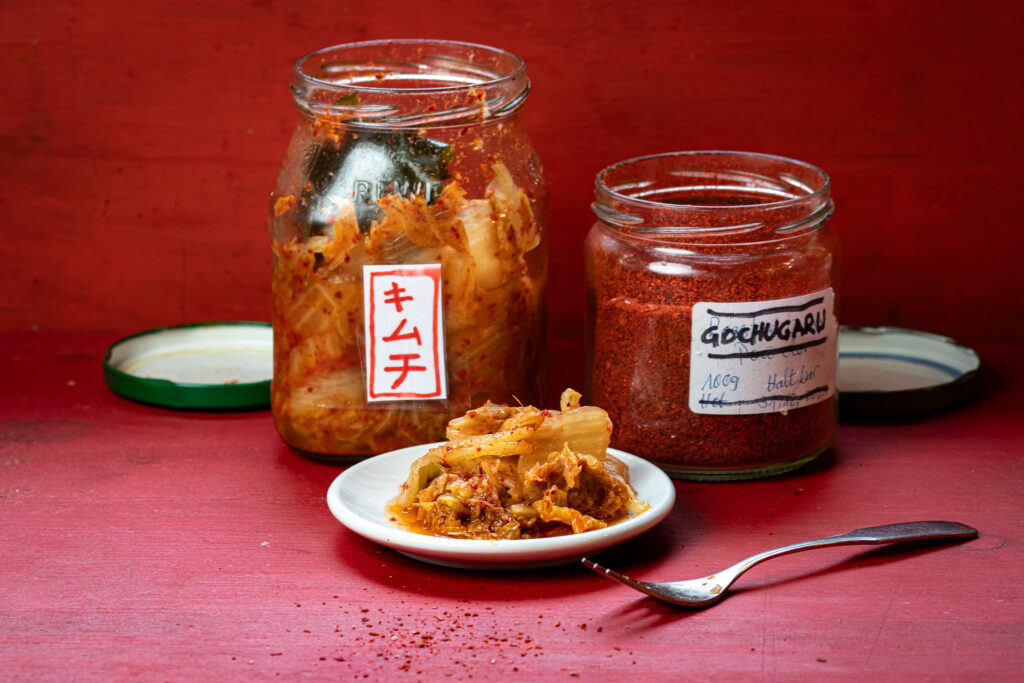
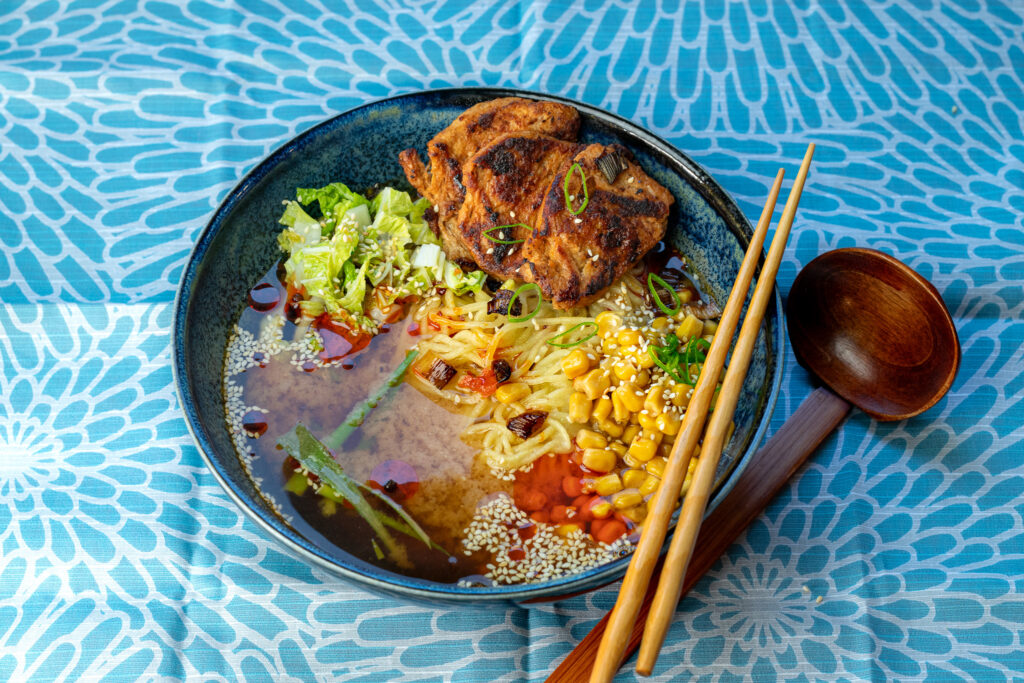
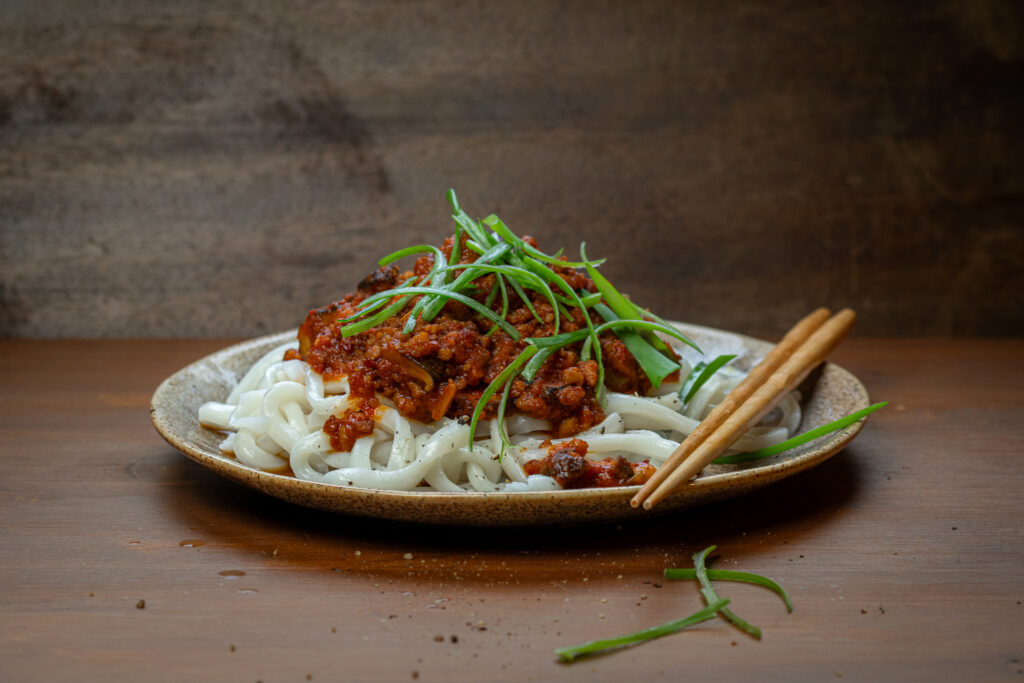
This is a quick & easy recipe for a vegan version of the Japanese classic Gyūdon – 牛丼 (beef bowl).
My recipe features chopped seitan. I like to use canned wheat gluten (seitan) from the Asian market, but fresh homemade or store-bought seitan, or other plant-based meat chunks (minimally seasoned) work well, too. If you use seitan or mock meat which is already seasoned, I suggest decreasing the amount of soy sauce in the recipe so it won’t be too salty. Alternately, you can rinse the seitan or mock meat before chopping and adding it to the wok.
I like to garnish the dish with homemade Kimchi (pickled cabbage with chili and garlic) and Shichimi Togarashi (seven spice mix with red chili) – recipes for both are in the JAPAN cookbook. I also top the dish with lightly roasted sesame seeds and chopped spring onion greens.
Oh, and I almost always make it with chopped mushrooms – see theVariations below!
Heat vegetable oil and sesame oil in a large pan or wok on medium heat.
Add chopped onion. Fry until browned and softened, stirring regularly, 5–7 min.
Add garlic, ginger, and ground black pepper. Fry until richly aromatic, stirring constantly, another 2–3 min.
Add chopped seitan. Mix well. Continue to fry until seitan is browned, stirring often, 5–7 min.
In a bowl, whisk shoyu, dark soy sauce, rice vinegar, mirin or rice syrup, sake (if using), and sugar. Stir this into the sizzling seitan. Simmer, stirring often, another 4–5 min.
Whisk Dashi and corn starch in a bowl. Gradually stir this whisked mixture into the wok. Simmer until thickened, stirring often, 3–4 min.
Reduce heat to medium low and simmer, partially covered, stirring often, another 3–5 min. Remove from heat. Cover and let sit for 5–10 min.
Portion Gohan steamed rice into bowls and top generously with seitan and sauce.
Garnish with Kimchi, Shichimi Togarashi, roasted sesame seeds, and spring onion greens.
Variations:
Mushrooms: Add 3–4 medium (100 g) chopped mushrooms along with seitan. Adjust soy sauce and salt as needed.
Pflanzenöl und Sesamöl in einer großen Pfanne oder einem Wok auf mittlerer Flamme erhitzen.
Gehackte Zwiebel hinzufügen. Unter Rühren 5 bis 7 Min. braten, bis sie weich und angebräunt ist.
Gehackten Knoblauch, Ingwer und gemahlenen schwarzen Pfeffer hinzufügen. Unter ständigem Rühren 2 bis 3 Min. weiter braten, bis es aromatisch duftet.
Gehackten Seitan hinzufügen. Gut mischen. 5 bis 7 Min. unter häufigem Rühren weiter braten, bis der Seitan angebräunt ist.
In einer Schüssel Shoyu, dunkle Sojasauce, Reisessig, Mirin oder Reissirup, Sake (falls verwendet) und Zucker verquirlen. Diese Mischung unter den brutzelnden Seitan rühren. Unter häufigem Rühren 4 bis 5 Min. köcheln lassen.
Dashi und Speisestärke in einer Schüssel verquirlen. Diese Mischung nach und nach in den Wok einrühren. Unter häufigem Rühren 3 bis 4 Min. weiter köcheln lassen, bis die Soße eindickt.
Auf mittlere Flamme reduzieren und halb abgedeckt noch 3 bis 5 Min. köcheln lassen, dabei gelegentlich umrühren. Vom Herd nehmen. Abdecken und 5 bis 10 Min. stehen lassen.
Gohan gedämpften Reis in Schüsseln portionieren. Großzügig mit Seitan und Soße bedecken.
Mit Kimchi, Shichimi Togarashi, gerösteten Sesamsamen und Frühlingszwiebelgrün garnieren.
Variationen:
Pilze: 3–4 mittelgroße (100 g) gehackte Pilze zusammen mit dem Seitan hinzufügen. Sojasauce und Salz nach Bedarf anpassen.
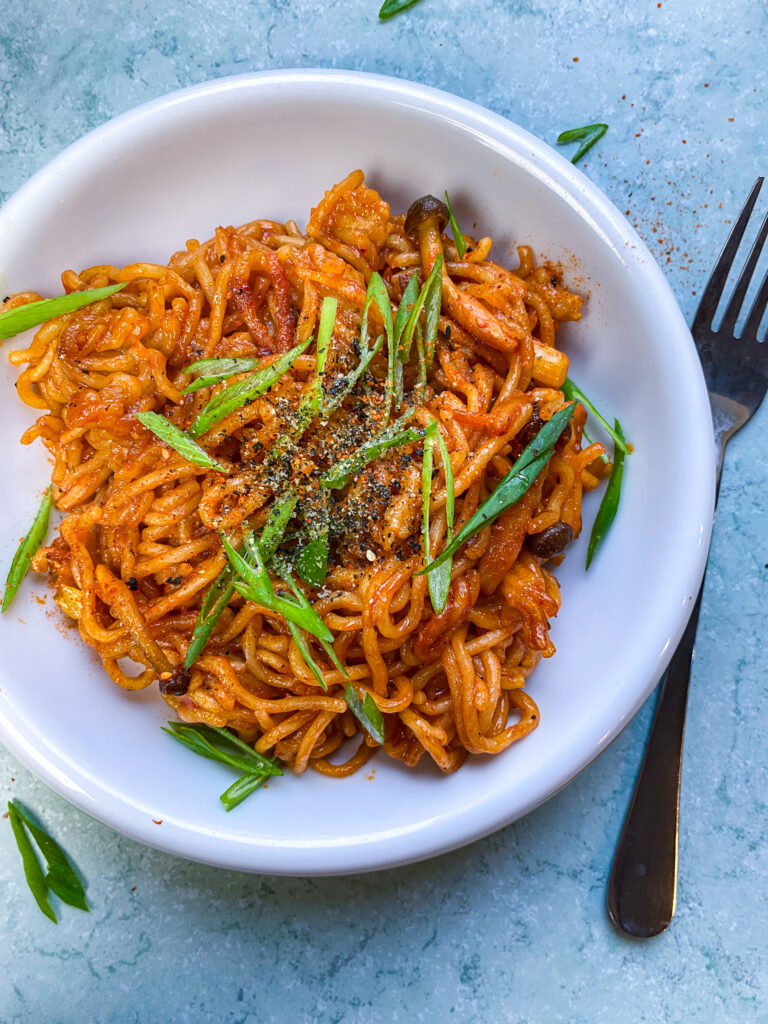
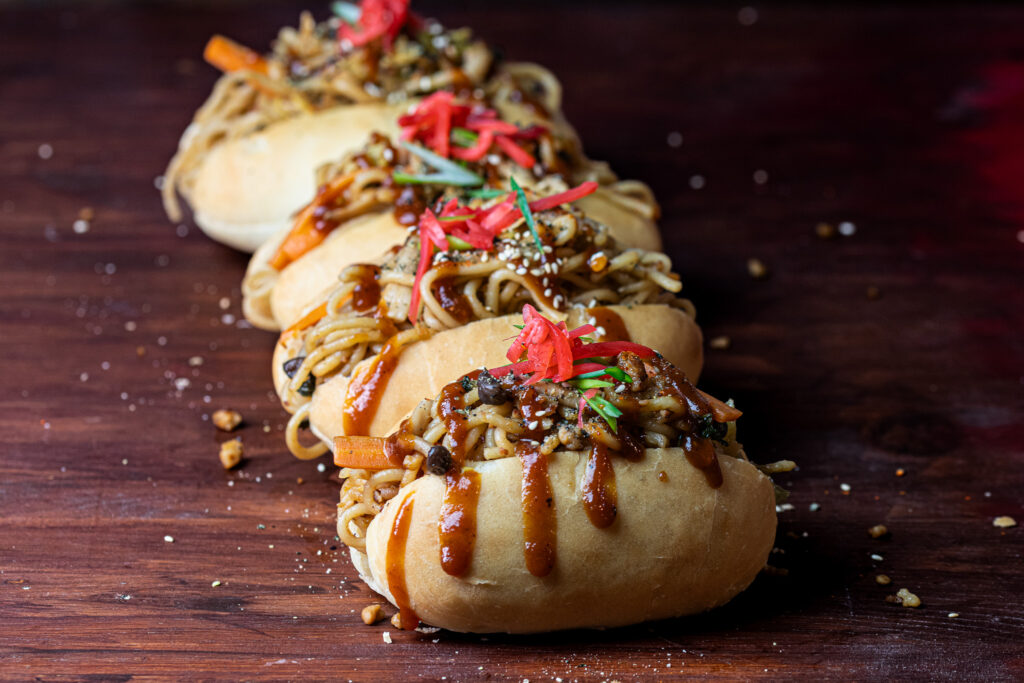
This recipe for Naporitan (ナポリタン) is another of my favorites from my new JAPAN cookbook. It was inspired by meals I’ve had in my travels to Japan and is the result of several years of experimentation in the kitchen. At grocery stores in Japan and Asian markets in Berlin I’ve often purchased Naporitan packaged noodles and sauce mix, and I’ve tested out a variety of recipes online… and from the stacks of Japanese cookbooks I’ve got.
The origins of the dish itself are a story of their own: Naporitan (or Napolitan) is a popular, noodle dish that was invented by a Japanese chef in Yokohama in times of limited ingredients following WWII.
Naporitan is considered to be yōshoku – western-influenced food, and itameshi – Italian-Japanese fusion cuisine. Traditionally this dish is made with ketchup, but I prefer a more home-made sauce based on tomato paste and crafted more creatively. This dish is great with all kinds of cooked noodles, whether fresh, packaged, or dried. In the JAPAN cookbook I’ve got recipes for fresh noodles (including the Somen, featured below). You can add fresh herbs (basil, oregano, rosemary, parsley, etc.), add fresh, cut vegetables, mushrooms, and other things to the mix, and serve the dish with shredded vegan cheese, if you desire.
9 oz (250 g) spaghetti or 9 oz (250 g) quick-cooking noodles or 2 packages (ea. 7 oz / 200 g) somen or ramen noodles or 14 oz (400 g) Somen noodles (page 196)
1 Tbs sesame oil or olive oil
If using spaghetti, cook noodles in rapidly boiling water just until al dente, about 6–8 min. Rinse in cold water in a sieve and drain well.
If using quick-cooking noodles or cooked (packaged) somen or ramen noodles, add them to a pot and cover with boiling hot water. Cover and let sit 8 min. Stir to separate and then drain well.
If using fresh Somennoodles, cook according to recipe (page 196) in rapidly boiling water, stirring often, until al dente, about 90 sec. Rinse in cold water in a sieve and drain well.
Toss drained noodles with 1 Tbs sesame oil or olive oil and set aside.
1 spring onion chopped
2 cloves garlic crushed or minced
2 Tbs olive oil or vegetable oil
3 Tbs tomato paste
1 Tbs shoyu (soy sauce)
2 tsp rice vinegar
2 tsp lemon juice
2 Tbs raw sugar
1 tsp sea salt more as needed
1/4 tsp black pepper ground
1/4 tsp paprika ground
1/4 tsp gochugaru (Korean ground red chili)
1/8 tsp turmeric ground
3 Tbs water more as needed
for garnish:
Furikake (page 45)
Shichimi Togarashi (page 43)
In a bowl, whisk tomato paste, shoyu, rice vinegar, lemon juice, sugar, salt, ground black pepper, paprika, gochugaru, turmeric, and 3 Tbs water until smooth.
Heat 2 Tbs olive oil or vegetable oil in a large wok on medium high heat.
Add chopped spring onion white ends and garlic. Fry until aromatic, stirring constantly, 1–2 min.
Pour whisked mixture into the hot wok. Bring to simmer and stir for 1 min.
Add cooked noodles. Stir to combine. Cook until the sauce thickens, noodles are well coated and slightly scorched, stirring often, 4–6 min, adding slightly more water if needed. Remove from heat.
Transfer noodles to plates or bowls.
Garnish with Furikake, Shichimi Togarashi, and chopped spring onion greens, and serve.
Variations:
Classic: Add 1/2 medium (100 g) green pepper thinly sliced and 2 oz (50 g) chopped vegan sausage or 2 medium (50 g) sliced mushrooms following spring onions and garlic. Fry for 4–6 min, stirring regularly. Adjust salt as needed. Cheesy: Garnish and serve with 1/2 cup (60 g) shredded vegan cheese or 1–2 Tbs roasted nut topping from Tomato Ramen (page 175).
Dieses Rezept für Naporitan (ナポリタン) ist auch ein Lieblingsgericht aus meinem neuen JAPAN-Kochbuch. Es wurde von meinen Japanreisen und jahrelangen Experimenten in der Küche inspiriert. In Supermärkten in Japan und in Asia-Läden in Berlin habe ich oft Naporitan-Nudelpackungen mit Soßenmischung gekauft – und ich habe unzählige Rezepte ausprobiert, sowohl online als auch aus meinen Stapeln japanischer Kochbücher.
Die Geschichte hinter dem Gericht ist übrigens auch spannend: Naporitan (oder Napolitan) wurde nach dem Zweiten Weltkrieg von einem japanischen Koch in Yokohama erfunden – zu einer Zeit, als viele Zutaten knapp waren.
Naporitan zählt zu den sogenannten Yōshoku-Gerichten – westlich beeinflusster Küche, und auch zu Itameshi – einer Art japanisch-italienischer Fusionsküche. Klassisch wird das Gericht mit Ketchup gemacht, aber ich mache es lieber mit einer selbstgemachten Soße mit Tomatenmark, die ein bisschen kreativer und aromatischer wirkt. Für das Gericht kannst du alle möglichen gekochten Nudeln verwenden – frisch, getrocknet oder aus der Packung. Im JAPAN-Kochbuch sind auch Rezepte für frische Nudeln (z.B. Somen-Nudeln). Wer mag, kann frische Kräuter wie Basilikum, Oregano, Rosmarin oder Petersilie, frisches Gemüse, Pilze oder andere Extras hinzufügen. Und wer’s richtig deftig mag, kann das Ganze auch mit pflanzlichem Reibekäse garnieren.
250 g Spaghetti oder 250 g Quick-Cooking-Weizennudeln oder 2 Packungen (je 200 g) Ramen-Nudeln oder 400 g Somen-Nudeln (Seite 196)
1 EL Sesamöl oder Olivenöl
Bei Verwendung von Spaghetti die Nudeln 6 bis 8 Min. in kochendem Wasser bissfest garen. Nudeln in einem Sieb mit kaltem Wasser abspülen und gut abtropfen lassen.
Bei Verwendung von Quick-Cooking-Nudeln oder gekochten (verpackten) Ramen-Nudeln diese in einen Topf geben und mit kochendem Wasser bedecken. Abdecken und 8 Min. stehen lassen. Leicht umrühren, um die Nudeln zu trennen. Abgießen und gut abtropfen lassen.
Bei Verwendung von frischen Somen-Nudeln diese nach Rezept (Seite 196) in kochendem Wasser ca. 90 Sek. bissfest kochen. In einem Sieb mit kaltem Wasser abspülen und gut abtropfen lassen.
Abgetropfte Nudeln mit 1 EL Sesamöl oder Olivenöl vermengen und beiseite stellen.
1 Frühlingszwiebel gehackt
2 Knoblauchzehen fein gehackt
2 EL Olivenöl oder Pflanzenöl
3 EL Tomatenmark
1 EL Shoyu (Sojasauce)
2 TL Reisessig
2 TL Zitronensaft
2 EL Rohzucker
1 TL Meersalz bei Bedarf mehr
1/4 TL schwarzer Pfeffer gemahlen
1/4 TL Paprikapulver
1/4 TL Gochugaru (koreanisches Chilipulver)
1/8 TL Kurkuma gemahlen
3 EL Wasser bei Bedarf mehr
zum Garnieren:
Furikake (Seite 45)
Shichimi Togarashi (Seite 43)
In einer Schüssel Tomatenmark, Shoyu, Reisessig, Zitronensaft, Zucker, Salz, gemahlenen schwarzer Pfeffer, Paprikapulver, Gochugaru, Kurkuma und 3 EL Wasser glatt verrühren.
2 EL Olivenöl oder Pflanzenöl in einem großen Wok auf mittlerer bis hoher Flamme erhitzen.
Gehackte weiße Frühlingszwiebel und Knoblauch hinzufügen. 1 bis 2 Min. unter Rühren anbraten, bis es aromatisch duftet.
Die angerührte Mischung in den heißen Wok gießen. Unter Rühren 1 Min. köcheln lassen.
Gekochte Nudeln hinzufügen und umrühren, um sie mit Soße zu bedecken. 4 bis 6 Min. unter gelegentlichem Rühren kochen, bis die Soße eindickt und die Nudeln leicht gebräunt sind, dabei bei Bedarf etwas mehr Wasser hinzufügen. Vom Herd nehmen.
Die Nudeln auf Tellern oder in Schüsseln portionieren.
Mit Furikake, Shichimi Togarashi und gehacktem Frühlingszwiebelgrün garnieren und servieren.
Variationen:
Klassisch: 100 g geschnittene grüne Paprika und 50 g Pilze oder vegane Wurst mit Frühlingszwiebel und Knoblauch hinzufügen und 4 bis 6 Min. braten. Salz nach Geschmack anpassen. Käse: Mit 1/2 Tasse (60 g) veganem Reibekäse oder 1–2 EL Cashew-Sesam-Topping vom Tomato Ramen (Seite 175) garnieren.
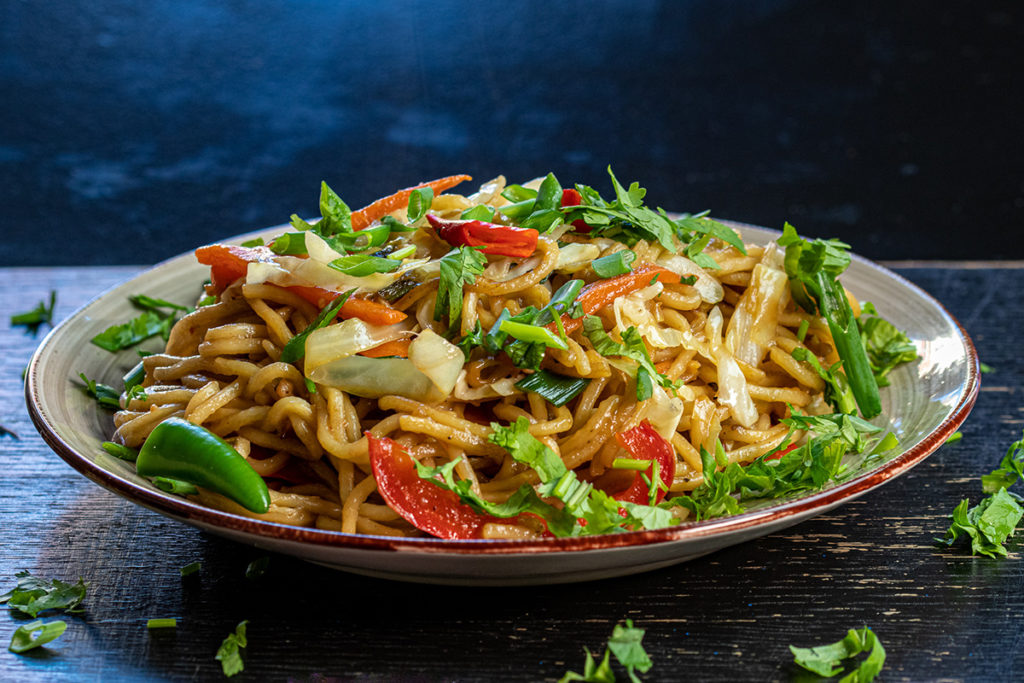
This recipe for Indochinese Hakka Noodles is inspired by countless dishes I had in my travels in India, as well as meals in Southeast Asia (especially Malaysia). I’ve been making variations of it for years, wherever I’ve lived. I got to experience it many times while living in Amravati, India for a year – some of my favorite restaurants in the city served amazing Indochinese dishes, prepared by Indian cooks who had specialized in Chinese cooking – and who obviously brought their own culinary influences, both personal and cultural to their recipes.
Hakka noodles are super simple to make and this dish goes together in about half an hour. You can, of course, use whatever vegetables you’ve got on hand. I’ve included several variations of the recipe; one of my favorites is the one with melted, shredded vegan cheese. I also love to add tofu cubes.
Cook noodles in a pot of boiling water with 1/2 tsp salt for 5–7 min. Noodles should be slightly undercooked. Drain and rinse with cold water. Toss with sesame oil and set aside.
Heat vegetable oil in a large pan or wok on medium high heat.
Add chopped spring onions white ends, garlic, ginger, and green chilies. Add ground coriander, black pepper, and white pepper. Fry, stirring constantly, until richly aromatic and garlic is browned, about 2–3 min.
Add chopped cabbage and carrot. Continue to stir-fry, until carrots start to soften, about 4–5 min.
Add sliced red pepper. Continue to fry, stirring often, another 3–4 min.
Add cooked noodles and mix well. Add soy sauce, rice vinegar or lemon juice, sugar, and salt. Continue to fry, stirring often, until noodles are scorched, another 3–5 min. Remove from heat.
Garnish with chopped spring onion greens and fresh coriander and serve.
Variations:
Curry leaves: Add 10–15 fresh or dried curry leaves with onions, garlic, ginger, and chilies. Vegetables: Substitute or add chopped broccoli, celery, mushrooms, baby corn, tomatoes, or other vegetables. Seitan, tofu, mock meat: Add chopped seitan, tofu, or vegan meats after adding vegetables. Adjust frying time as needed. Adjust salt and soy sauce to taste. Cheesy: After the noodles are scorched and the dish is almost done, top fried noodles with a handful of shredded vegan cheese. Mix a few times, add 1–2 Tbs of water, immediately cover the pot, turn off the heat, and let the steam melt the cheese.
Dieses Rezept für indochinesische Hakka Noodles ist inspiriert von unzähligen Gerichten, die ich auf meinen Reisen durch Indien gegessen habe – und auch in Südostasien, besonders in Malaysia. Ich mach das Gericht in verschiedenen Varianten schon seit Jahren, egal wo ich gerade wohne. Als ich ein Jahr lang in Amravati, Indien gelebt hab, hatte ich öfter die Gelegenheit, das Gericht zu essen – einige meiner Lieblingsrestaurants dort hatten richtig gute indochinesische Gerichten. Die wurde von indischen Köchen gemacht, die sich auf chinesisches Kochen spezialisiert hatten – und dabei natürlich ihre eigenen Einflüsse mit reingebracht haben, sowohl kulturell als auch ganz persönlich.
Hakka Noodles sind ganz einfach zu machen, und das Ganze steht in ungefähr einer halben Stunde auf dem Tisch. Du kannst natürlich auch einfach das Gemüse verwenden, das du gerade da hast. Ich hab dir ein paar Varianten vom Rezept aufgeschrieben – eine meiner liebsten ist die mit geschmolzenem, veganem Reibkäse. Frittierte Tofuwürfel dazu finde ich auch super lecker.
Hakka Noodles gebratene Nudeln mit Weiflkohl, Möhren & Paprika
Weizennudeln mit 1/2 TL Salz in einem großen Topf mit kochendem Wasser 5 bis 7 Min. bissfest kochen. Abgießen und Sesamöl untermischen. Abdecken und beiseitestellen
In einem großen Topf Öl auf mittlerer bis hoher Flamme erhitzen.
Gehackte weiße Frühlingszwiebelringe,Knoblauch, Ingwer, grüne Chilischoten, Koriander, schwarzen Pfeffer und weißen Pfeffer hineingeben. 2 bis 3 Min. unter Rühren anschwitzen, bis es aromatisch duftet.
Gehackten Weißkohl und Möhre hinzufügen. 4 bis 6 Min. anbraten, bis die Möhre weich wird.
Rote Paprika einrühren. Unter Rühren weitere 3–4 min anbraten.
Gekochte Nudeln hineingeben. Gut umrühren. Sojasoße, Reisessig oder Zitronensaft, Zucker und Salz einrühren. Unter Rühren 3 bis 5 Min. weiter anbraten, bis die Nudeln leicht angeschmort sind. Vom Herd nehmen.
Mit grünen Frühlingszwiebelringen und gehacktem Koriandergrün garnieren und servieren.
Variationen:
Curryblätter: Eine Handvoll frische oder getrocknete Curryblätter zusammen mit den Frühlings-zwiebeln hineingeben. Gemüse: Brokkoli, Blumenkohl, Staudensellerie, Pilze, Maiskölbchen und/oder Tomaten hinzufügen. Tofu & Seitan: Gehackten Tofu, Seitan oder Fleischersatz vor dem Gemüse kurz anbraten. Cheese Noodles: Nachdem die Nudeln angeschmort sind, pflanzlichen Reibkäse darüberstreuen. Umrühren. Mit 1–2 EL Wasser besprenkeln. Abdecken. Käse 2 bis 3 Min. schmelzen lassen. Bei allen Variationen Kochzeit, Salz und Sojasoße anpassen.
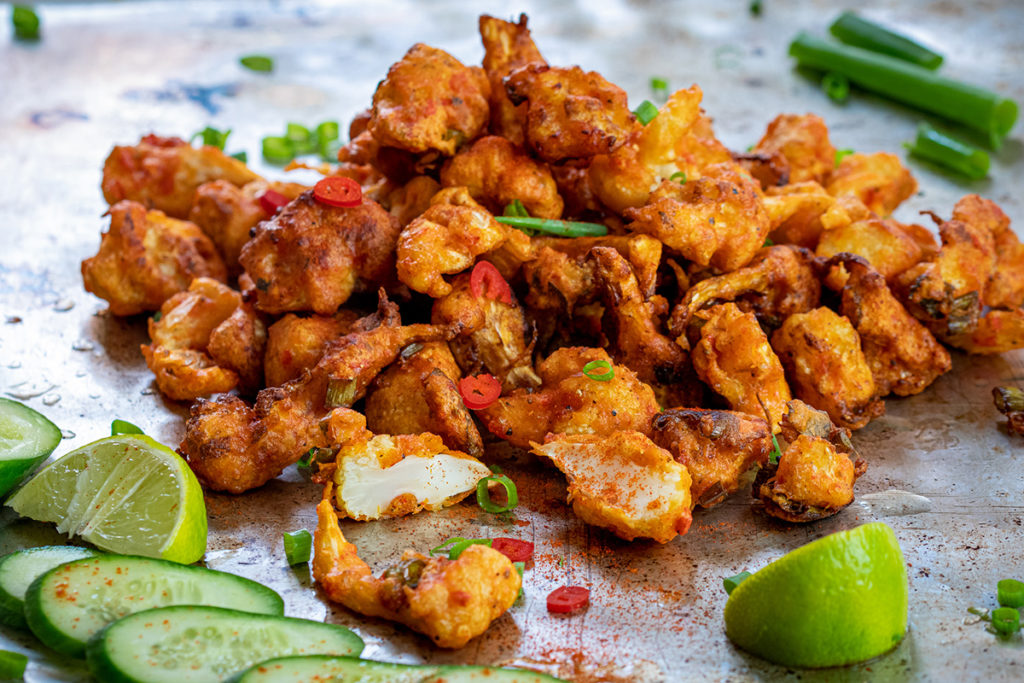
Chop cauliflower into small florets. In a large pot or bowl, cover chopped cauliflower with boiling hot water, cover, and let soak for 10 min. Drain thoroughly, discard water.
In a blender or small food processor, blend spring onion white ends, garlic, ginger, and red chilies with lemon juice and 1–2 Tbs water until smooth, adding slightly more water if needed.
Combine corn starch, rice flour, chickpea flour, sugar, chili powder, ground paprika, coriander, black pepper, turmeric, garam masala, curry leaves (if using), spring onion greens, and salt in a large mixing bowl.
Mix blended spice paste into dry ingredients. Add cauliflower pieces and mix well to coat thoroughly.
Heat oil about 2 in (5 cm) deep in medium pot on medium high heat. Oil is hot enough when a piece of battered cauliflower sizzles and surfaces almost immediately.
Carefully slip individual cauliflower pieces into the hot oil. Fry until deep golden brown, 3–5 min, turning regularly with a metal slotted spoon. Do not crowd oil or the temperature will drop and they’ll soak up oil instead of frying well. Wait 20–30 sec between batches for oil to heat back up.
Carefully drain and transfer fried cauliflower pieces to a plate or bowl with paper towels to absorb excess oil. Continue for all pieces.
Serve with lime wedges and Tomato Chutney (page 23) or Green Chili Chutney (page 25).
Blumenkohl in kleine Röschen zerteilen und in einen Topf geben. Mit kochendem Wasser bedecken. Topf abdecken und 10 Min. stehen lassen. Abgießen und gut abtropfen lassen.
Weiße Frühlingszwiebelringe, Knoblauch, Ingwer und Chilischoten mit Zitronensaft und 1–2 EL Wasser in einem Mixer oder einer kleinen Küchenmaschine glatt pürieren. Bei Bedarf etwas mehr Wasser untermixen.
In einer großen Schüssel Speisestärke, Reismehl, Kichererbsenmehl, Zucker, Chilipulver, Paprikapulver, Koriander, schwarzen Pfeffer, Kurkuma, Garam Masala, Curryblätter (falls verwendet), grüne Frühlingszwiebelringe und Salz gut miteinander vermischen.
Pürierte Gewürzpaste unter die trockenen Zutaten rühren. Blumenkohlröschen hinzufügen und gut mit der Mischung überziehen.
Öl 5 cm hoch in einen tiefen mittelgroßen Topf geben und auf mittlerer bis hoher Flamme erhitzen. Das Öl ist heiß genug, wenn eine kleine Menge Teig nach dem Hineingeben schnell brutzelnd an die Oberfläche steigt.
Vorsichtig einige der mit Teig überzogenen Blumenkohlröschen ins heiße Öl geben. 3 bis 5 Min. goldbraun frittieren und dabei regelmäßig mit einem Schaumlöffel aus Metall wenden. Topf nicht überladen, damit die Temperatur konstant bleibt und die Blumenkohlröschen knusprig werden, statt sich mit Öl vollzusaugen. Zwischen den Frittierdurchgängen 20 bis 30 Sek. warten, damit das Öl wieder heiß wird.
Fertige Stücke mit dem Schaumlöffel herausheben, abtropfen lassen und auf einen mit Küchenpapier ausgelegten Teller legen, um überschüssiges Öl aufzusaugen. Restliche Röschen frittieren.
Mit Limettenspalten und Tomato Chutney (Seite 23) oder Green Chili Chutney (Seite 25) servieren.
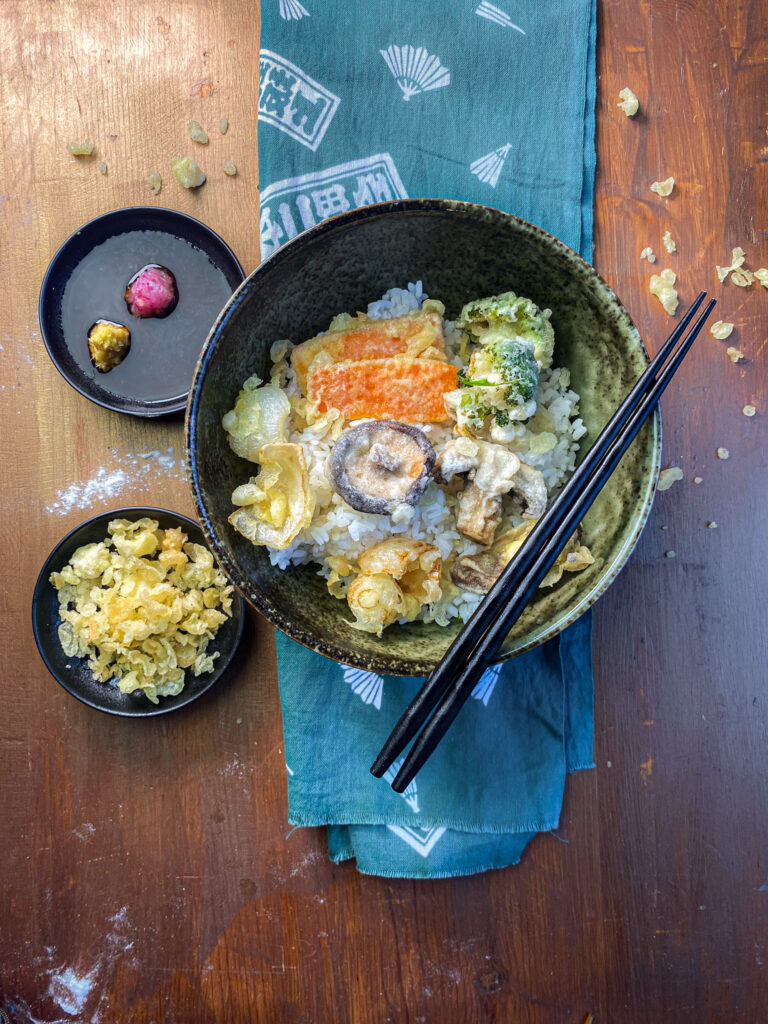
This is one of my favorite recipes in The Lotus and the Artichoke – JAPAN. It’s remarkably easy and quick to make – and it’s always satisfying.
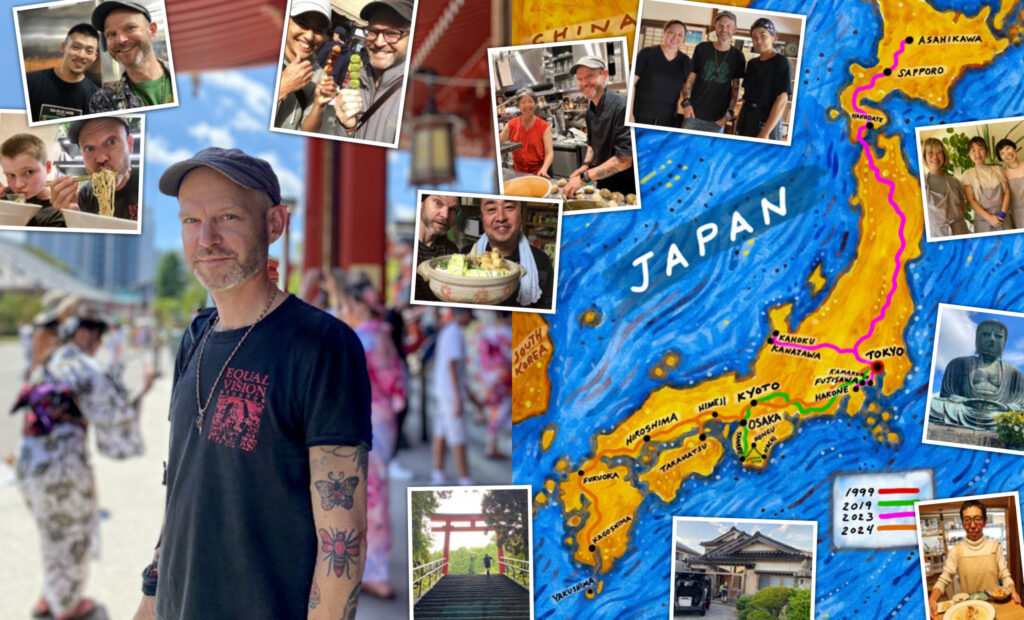
In the summer of 2024, on my third trip to Japan, I spent a few days in Takamatsu. I’d been wanting to get to the island of Shikoku, famous for the 88 temple pilgrimage. I hope to do this two month trek one day, but my son and I were only in Japan for three weeks this time. I figured a visit to Takamatsu, the udon capital of Japan, would be a tasty introduction to Shikoku.
I rented a small apartment with a kitchen. Every day we’d go to the supermarket and get fresh udon noodles, tofu, vegetables, and mushrooms. It was the first time I was working with instant dashi powder, and the results were better than I expected. Still, I prefer to make my own Dashi, with kombu (kelp) and dried shiitake mushrooms – both of which I also got at the store and used for cooking while in Japan, and to bring back to Berlin.
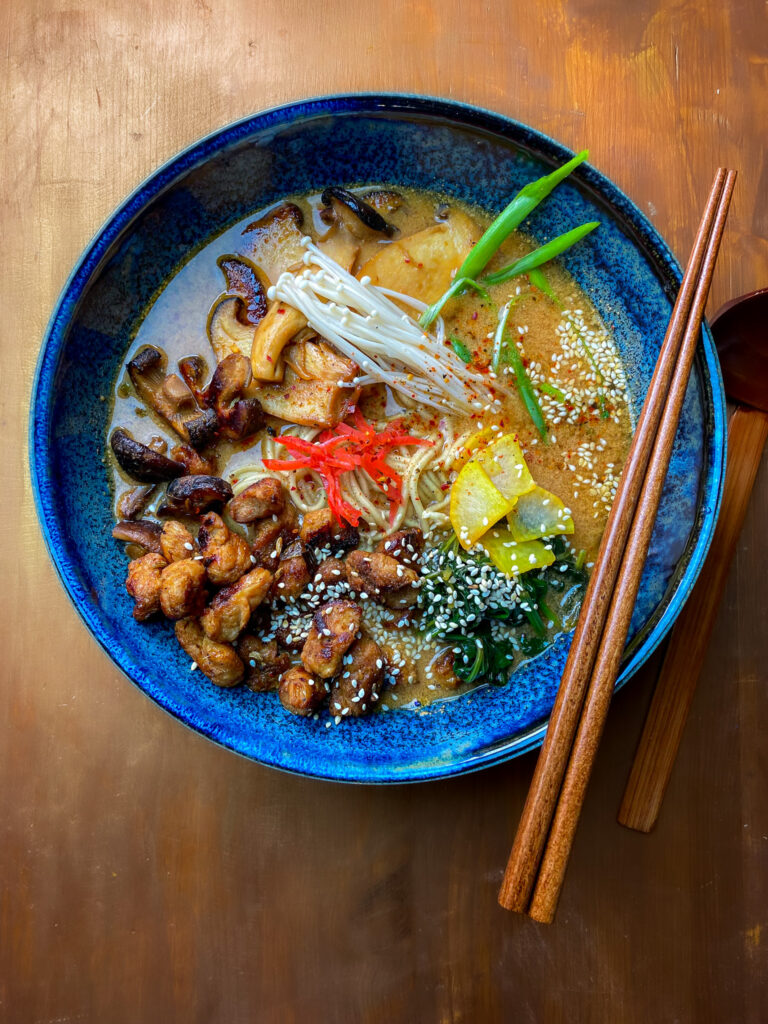
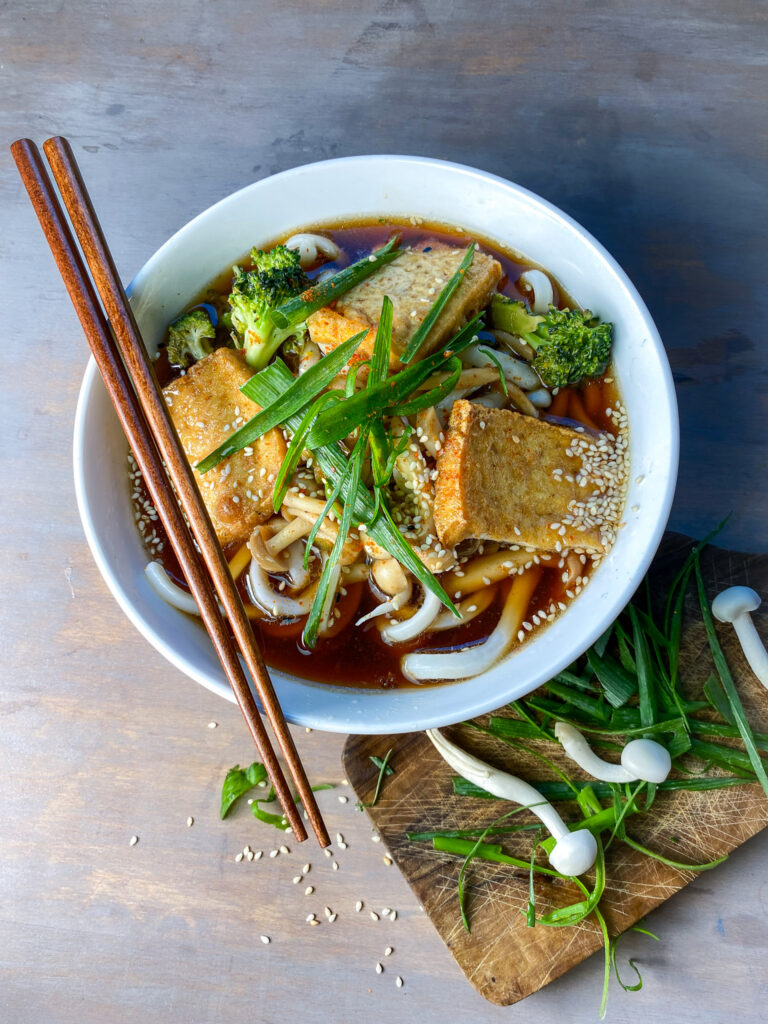
This recipe for Kake Udon evolved from those cooking experiments and several restaurant experiences last summer. The variation was inspired by an incredible bowl of Kitsune Udon (see Variations below) at a place in downtown Hiroshima. Both dishes are amazing with fresh udon noodles – for which there’s a recipe in the JAPAN cookbook & e-book. They’re also delicious when made with packaged udon noodles from the store.
Once you’ve got dashi (broth) and udon noodles ready to go, it all goes together quickly and is on the table in under half an hour.
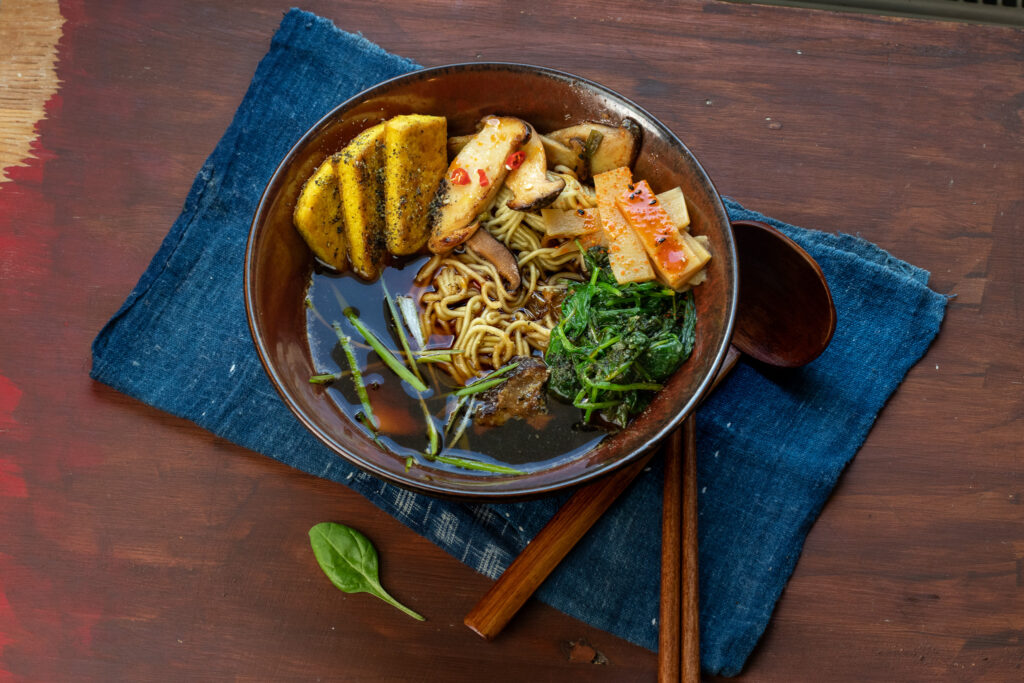
Kake Udon noodles in soy sauce broth with tofu & mushrooms
If using shimeji mushrooms, after rinsing, cut and discard the thick ends, and separate them into small bunches. If using brownmushrooms, chop or slice them.
Heat vegetable oil and sesame oil in a medium frying pan or wok on medium heat.
Add chopped spring onion white ends, garlic, and ginger. Fry until richly aromatic, stirring regularly, for 1–2 min.
Add tofu slabs. Fry until lightly browned, turning regularly, 3–5 min.
Add separated or chopped/sliced mushroom. Continue to fry, stirring often, until mushrooms begin to soften and brown, and tofu slabs are golden brown, another 3–5 min.
Stir in Dashi, shoyu, mirin or rice syrup, sugar, rice vinegar, and sake (if using) and bring to gentle boil. Simmer on medium low for 3–5 min. Turn off heat.
If using fresh Udon noodles, cook according to recipe (page 193) in rapidly boiling water, stirring often, until al dente, about 7–10 min.
If using packaged (cooked) udon noodles, cover with boiling water in a pot and let sit 8 min.
Drain noodles and portion into large bowls.
Carefully pour or ladle hot broth onto the noodles. Top with tofu and mushrooms.
Garnish with chopped spring onion greens, roasted sesame seeds, Shichimi Togarashi, and serve.
Variations:
Kitsune Udon: Instead of frying tofu slabs, just fry mushrooms for 3–5 min as above before adding Dashi and other broth ingredients. Simmer briefly, then add 4 to 6 inari-age (sweet, fried tofu pockets) to the broth. Simmer another 1–2 min. Prepare noodles, portion them into bowls, and cover with hot broth. Arrange inari-age and mushrooms on top. Garnish and serve.
Im Sommer 2024, auf meiner dritten Japanreise, verbrachte ich ein paar Tage in Takamatsu. Ich wollte schon lange mal nach Shikoku – die Insel bekannt für die 88-Tempel-Pilgerreise. Irgendwann möchte ich diese zwei Monate lange Tour wirklich machen. Diesmal war ich aber mit meinem Sohn nur drei Wochen unterwegs. Also dachte ich: Ein Abstecher nach Takamatsu, der Udon-Hauptstadt Japans, wäre perfekt, um Shikoku ein bisschen kennenzulernen.
Dort habe ich eine kleine Wohnung mit Küche gemietet. Jeden Tag sind wir in den Supermarkt gegangen und haben frische Udon-Nudeln, Tofu, Gemüse und Pilze geholt. Zum ersten Mal habe ich mit Instant-Dashi-Pulver gekocht – und fand es überraschend gut. Trotzdem mach ich Dashi lieber selbst – mit Kombu (Meeresalge) und getrockneten Shiitake-Pilzen. Die hab ich dort auch im Laden gefunden – zum Kochen unterwegs und zum Mitnehmen wieder nach Berlin.
Das Rezept für Kake Udon ist aus diesen Küchenerlebnissen und ein paar Restaurantbesuchen letzten Sommer entstanden. Die Variation wurde inspiriert von Kitsune Udon (siehe Variationen unten), die ich in einem kleinen Laden in Hiroshima gegessen habe. Beide Versionen schmecken immer am Besten mit frischen Udon-Nudeln – das Rezept dafür ist in meinem JAPAN-Kochbuch & E-Book. Aber auch mit Nudeln-Packungen vom Asialaden sind sie super lecker… und unkompliziert.
Wenn du Dashi (Brühe) und Udon-Nudeln bereit hast, geht alles ganz schnell – das Gericht steht in weniger als einer halben Stunde auf dem Tisch.
Kake Udon Nudeln in Sojasaucenbrühe mit Tofu & Pilzen
Raue Stielansätze von Shimeji-Pilzen abschneiden und die Pilze in kleine Bündel teilen bzw. Champignons in Scheiben schneiden.
Pflanzenöl und Sesamöl in einer mittelgroßen Pfanne oder einem Wok auf mittlerer Flamme erhitzen.
Gehackte weiße Frühlingszwiebel, Knoblauch und Ingwer hinzufügen. Unter Rühren 1 bis 2 Min. anbraten, bis es aromatisch duftet.
Tofuscheiben hinzufügen. Unter regelmäßigem Wenden 3 bis 5 Min. braten, bis sie leicht angebräunt sind.
Pilze hinzufügen. Unter häufigem Rühren 3 bis 5 Min. weiter braten, bis die Pilze weich und angebräunt sind und der Tofu goldbraun und kross ist.
Dashi, Shoyu, Mirin oder Reissirup, Zucker, Reisessig und Sake (falls verwendet) einrühren und zum Kochen bringen. Auf mittlerer bis niedriger Flamme 3 bis 5 Min. köcheln lassen. Flamme ausschalten.
Bei Verwendung von frischen Udon-Nudeln diese nach Rezept (Seite 193) in sprudelnd kochendem Wasser unter häufigem Rühren 7 bis 10 Min. bissfest garen.
Bei Verwendung von gekochten (verpackten) Udon-Nudeln diese in einen Topf geben und mit kochendem Wasser bedecken. 10 Min. stehen lassen.
Nudeln abgießen und in große Schüsseln portionieren.
Heiße Brühe über die Nudeln gießen oder schöpfen. Mit Tofu und Pilzen anrichten.
Mit gehacktem Frühlingszwiebelgrün, Sesamsamen und Shichimi Togarashi garnieren. Servieren.
Variationen:
Kitsune Udon: Nur Pilze (keinen Tofu) wie oben beschrieben 3 bis 5 Min. anbraten. Dashi und andere Zutaten für die Brühe hinzufügen und kurz köcheln lassen. 4 bis 6 Inari-Age (süße, frittierte Tofutaschen) hineingeben. Gekochte Nudeln zubereiten und in große Schüsseln portionieren, mit Brühe übergießen und mit Pilzen, Tofutaschen und Garnierungen anrichten.
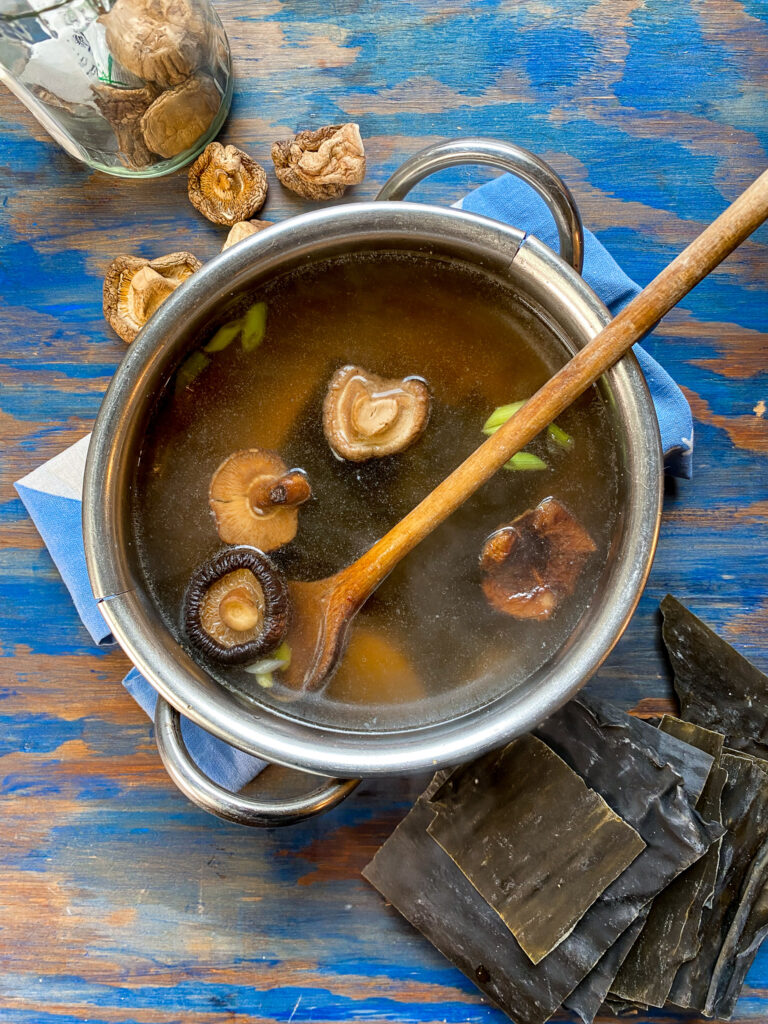
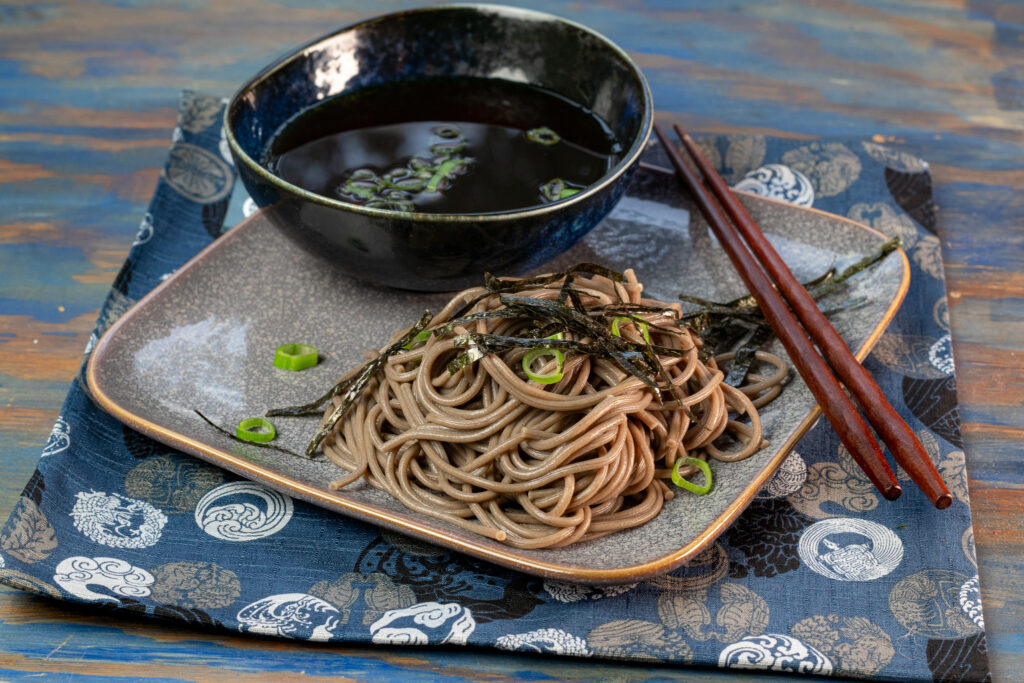
Dashi is a key component in many Japanese dishes. Below, you’ll find two broth recipes that work great for all the dishes in The Lotus and the Artichoke – JAPAN that call for dashi. You can also use instant dashi powder dissolved in water – but naturally, homemade dashi has a deeper flavor and more character.
For recipes that only need a small amount of dashi, you can often substitute water in equal measure. But for ramen, soups, and noodle bowls (like Kake Udon—which I’ll be posting soon), I strongly recommend using a proper dashi base, such as the two recipes below.
Dashi can also add depth to dipping sauces, though it’s not always strictly necessary. If you’re short on time, at least make the Shiitake Dashi (see the second recipe). And if you’ve got a piece of kombu (dried kelp) on hand, toss it in – to boost the flavor.
Add dried shiitake mushrooms to a medium pot and cover with boiling hot water.
Cover and let sit for 1–2 hrs.
Remove soaked shiitake mushrooms and squeeze to expel broth. Transfer them to a bowl to use later for other recipes.
Stir shoyu and salt into broth.
Strain broth into a jar or sealable container.
Use broth immediately, or store in the fridge for up to 5 days.
Dashi ist eine wichtige Zutat für viele japanische Rezepte. Unten folgen zwei Rezepte für Brühe – beide passen super für alle Gerichte in The Lotus and the Artichoke – JAPAN, in denen Dashi vorkommt. Alternativ kannst du auch fertiges Dashi-Pulver im Asialaden kaufen und es in Wasser auflösen. Selbstgemachtes Dashi hat natürlich mehr Geschmack und Aromen.
Bei Rezepten, wo nur wenig Dashi gebraucht wird, reicht auch einfach die gleiche Menge Wasser. Für Ramen und die meisten Suppen (auch für Kake Udon) empfehle ich aber auf jeden Fall Dashi – zum Beispiel eine der beiden Varianten unten.
Auch für Dipsaucen ist Dashi oft hilfreich – aber nicht immer unbedingt nötig. Wenn’s schnell gehen muss, mach am besten wenigstens das Shiitake-Dashi (das zweite Rezept unten). Wenn du es hast, wirf ruhig noch ein kleines oder mittleres Stück Kombu (getrocknete Meeresalge) mit rein.
Kombu Shiitake Dashi Brühe aus Meeresalge & Shiitake-Pilzen
Growing up, it took me a while to warm up to eggplant.
As a kid, I just wasn’t into the taste and texture. Tastes change and evolve, and over the years – especially in my travels – I discovered many dishes with eggplant which taught me to love the vegetable: Italian-American Eggplant Parmesan and Italian Parmigiana di Melanzane, Chinese-American Garlic Eggplant, North Indian Bengan Bhartha, Persian (Iranian) Mirza Ghasemi, and Middle Eastern (Levantine) Baba Ganoush. (I also learned that eggplant was known as aubergine in other parts of the English-speaking world.)
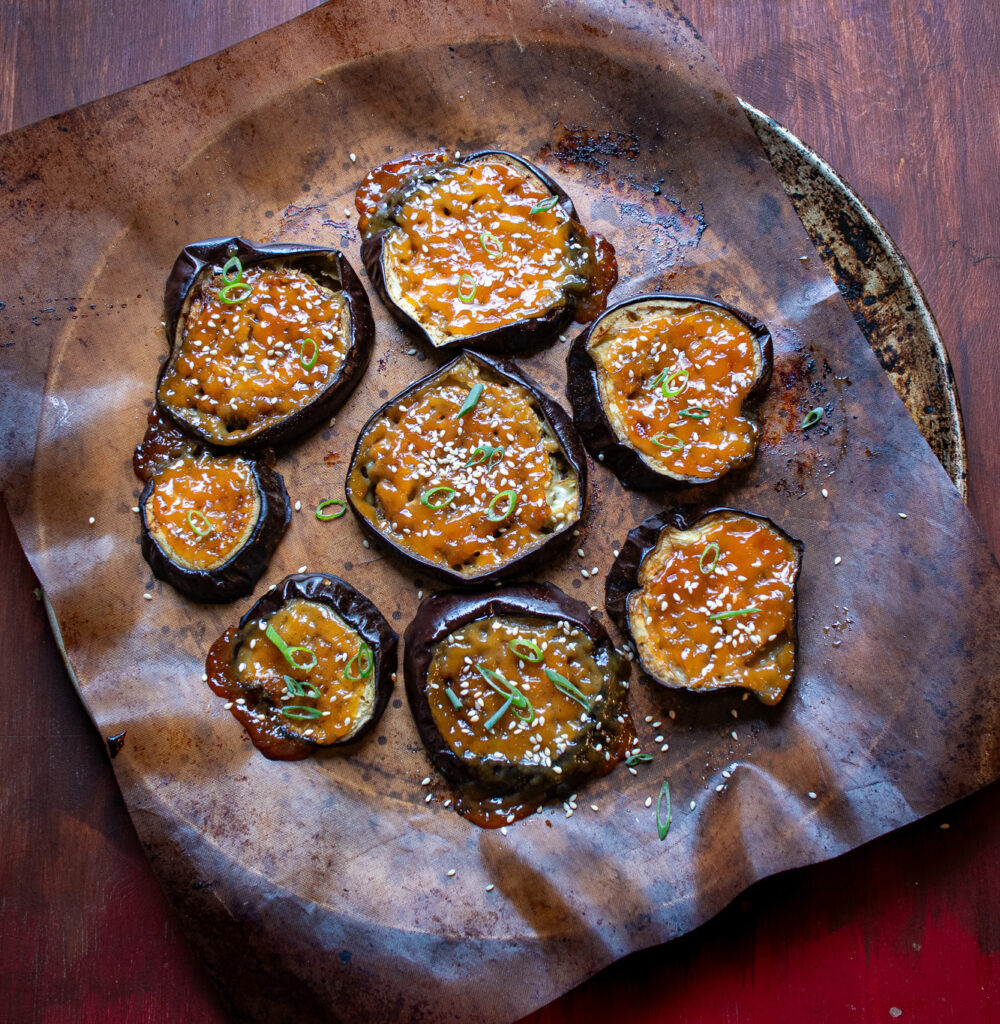
The first time I had Japanese Nasu Dengaku was only a decade ago.
I was immediately taken by the rich, smoky flavors of roasted eggplant coupled with the sweet & salty miso glaze. A friend of mine shared a recipe; I tried it out and absolutely loved it. I developed my own recipe and made it regularly for friends, family, and dinner parties.
It was clear I’d include Nasu Dengaku. During the early recipe development and photography for the book, I set out to refine my recipe further. After several sessions of experimentation, I settled on this version. (For what it’s worth, I’m not thrilled with the photo, but in a rare case of overcoming Masterpiece Syndrome, I decided to let go and use it for the cookbook and website, rather than shoot it a third – or fourth – time hoping for a better studio photo.)
Nasu Dengaku is an excellent dish for getting others (including young eaters) into aubergine.
The salting, rinsing, and then roasting of the eggplants draws out most of the characteristic bitterness. The sweet miso glaze rounds out the rest. Many will tell you that the eggplants in stores now are less bitter than a couple decades ago. While this may be true, I still prefer to salt and rinse the vegetable slices beforehand. Admittedly, much my reasoning is nostalgic – When I was first getting into cooking as a teen, my mother had taught me the trick with eggplant for baked casseroles and lasagna.
Tweak this recipe to your heart’s content; it’s very versatile and forgiving. Sake is not crucial, but is a nice touch. The same goes for mirin. You can also use white miso paste instead of red. I would emphasize that you don’t want to burn the glaze, but truth be told, if you follow the recipe and keep an eye on your oven, I’m sure you’ll be just fine.
By the way, there’s similar recipe in the dessert section of The Lotus and the Artichoke – JAPAN for Ichijiku Dengaku, roasted miso-glazed figs. It’s a lot of fun, too!
3–4 medium (300 g) long, thin Asian/Japanese eggplants (aubergines) or 1 medium (300 g) eggplant (aubergine)
2 Tbs (45 g) red miso paste
2 1/2 Tbs (30 g) raw sugar
2 Tbs vegetable oil
1 Tbs mirin optional
2 tsp sake optional
2 Tbs sesame oil
2–3 tsp sesame seeds lightly roasted
Preheat oven to 400° F / 200° C / level 6.
Cut long, thin eggplants (aubergines) in half lengthwise or into round slices about 1/2 in (12 mm) thick. If using a larger eggplant, cut it into round slices or lengthwise slabs about 1/2 in (12 mm) thick.
Soak eggplant halves or slices in a large bowl of cold water for 10 min.
Heat a small pot on medium low heat. Add miso paste, sugar, vegetable oil, mirin, and sake (if using). Whisk until smooth and sugar is melted, 2–3 min. Remove from heat. Set aside.
Drain, rinse, and dry eggplant halves or slices.
Brush eggplant halves or slices on both sides with sesame oil and arrange them on a baking tray lined with baking paper or a silicone baking mat, facing down if using halves.
Transfer to the oven and bake on the top rack until tender, 25–40 min. The flesh should be browned and skins shriveled. If the slices or halves are thick, the baking time may need to be increased.
Flip the eggplant halves or slices. Using a spoon or brush, generously coat the flesh with miso glaze.
Bake until the glaze is bubbly and caramelized, about 5–8 min. Be careful not to burn the glaze!
Lange, dünne Auberginen in runde Scheiben von etwa 12 mm Dicke schneiden oder der Länge nach halbieren. Größere Auberginen in runde Scheiben oder längs in ca. 12 mm dicke Platten schneiden.
Auberginenhälften oder -scheiben 10 Min. in einer großen Schüssel mit kaltem Wasser einweichen.
Einen kleinen Topf auf mittlerer bis niedriger Flamme erhitzen. Misopaste, Zucker, Pflanzenöl, Mirin und Sake (falls verwendet) hineingeben. Aufkochen lassen und 2 bis 3 Min. verrühren, bis der Zucker geschmolzen ist und die Mischung glatt wird. Vom Herd nehmen. Beiseite stellen.
Auberginenhälften oder -scheiben abgießen, abspülen und trocknen.
Auberginenhälften oder -scheiben auf beiden Seiten mit Sesamöl bepinseln und auf ein mit Backpapier oder Silikonbackmatte ausgelegtes Backblech legen – Hälften mit der Schnittfläche nach unten.
In den vorgeheizten Ofen geben und auf der obersten Schiene 25 bis 40 Min. rösten, bis das Fruchtfleisch weich und gebräunt und die Haut verschrumpelt ist. Wenn die Scheiben oder Hälften dick sind, muss die Backzeit eventuell verlängert werden.
Die Auberginenhälften oder -scheiben auf dem Blech wenden. Das Fruchtfleisch mit einem Löffel oder Pinsel großzügig mit Misoglasur bestreichen.
Auf der obersten Schiene noch 5 bis 8 Min. backen, bis die Misoglasur blubbert und karamellisiert ist. Aufpassen, dass die Glasur nicht verbrennt!
Aus dem Ofen nehmen. 10 Min. abkühlen lassen.
Mit gerösteten Sesamsamen garnieren und servieren.
In a large mixing bowl, combine flour, sugar, matcha powder, baking powder, and salt.
In another bowl, gently whisk soy milk, soy yogurt, lemon juice, and rice vinegar.
Melt the margarine in a small pan on low heat. Remove from heat.
Pour wet mixture and melted margarine into dry ingredients in the large bowl. Stir until mostly smooth with a cake spatula or large spoon. Do not overmix the batter.
Grease an 8 in (20 cm) round cake tin or square baking dish. Pour batter and spread evenly in the cake tin or baking dish.
Bake on the middle rack in the oven until firm and a toothpick comes out clean, 40–50 min.
Remove from oven and let cool completely, 1–2 hrs.
lemon icing:
1/4 cup + 1 Tbs (30 g) powdered sugar
1/4 tsp matcha powder
2 tsp soy milk
1 tsp lemon juice
roasted almonds:
2 Tbs almonds lightly roasted, chopped
In a bowl, combine powdered sugar, matcha powder, soy milk, and lemon juice. Whisk until smooth.
Drizzle icing over the cooled cake.
Garnish with roasted, chopped almonds.
Let sit 30–60 min before slicing and serving.
Matcha Keki Grüntee-Kuchen mit Zitronenglasur & gerösteten Mandeln
Mehl, Zucker, Matchapulver, Backpulver und Salz in einer großen Rührschüssel vermischen.
Sojamilch, Sojajoghurt, Zitronensaft und Reisessig in einer zweiten Schüssel verrühren.
Margarine in einer kleinen Pfanne auf niedriger Flamme zerlassen. Vom Herd nehmen.
Angerührte Mischung und zerlassene Margarine mit einem Spatel oder einem großem Löffel nach und nach unter die trockenen Zutaten rühren, bis alles gut vermischt, aber nicht zu stark verrührt ist.
Eine mittelgroße (ca. 20 cm) runde oder quadratische Backform einfetten. Teig in die Form geben und gleichmäßig verteilen.
40 bis 50 Min. auf der mittleren Schiene des Ofens backen. Mit einem Zahnstocher überprüfen, ob der Kuchen fertig gebacken ist, er sollte nach dem Einstechen ohne Teigreste wieder herauskommen.
Aus dem Ofen nehmen und 1 bis 2 Stunden vollständig abkühlen lassen.
Zitronenglasur:
1/4 Tasse + 1 EL (30 g) Puderzucker
1/4 TL Matchapulver
2 TL Sojamilch
1 TL Zitronensaft
geröstete Mandeln:
2 EL Mandeln leicht geröstet, gehackt
Puderzucker, Matchapulver, Sojamilch und Zitronensaft in einer Schüssel glatt verquirlen.
Die Glasur über den abgekühlten Kuchen träufeln.
Mit gerösteten, gehackten Mandeln garnieren.
Vor dem Aufschneiden und Servieren 30 bis 60 Min. stehen lassen.
Add chopped onion. Cook, partially covered, until onion begins to soften, stirring often, 5–8 min.
Add garlic, ginger, curry leaves, ground cumin, coriander, black pepper, turmeric, cinnamon, bay leaves, black cardamon, and red chili (if using). Fry, stirring often, until richly aromatic, 2–3 min.
Add chopped potatoes and carrots. Stir to combine.
Cook partially covered until vegetables start to soften, 6–8 min, adding 1–2 Tbs water if needed, stirring often.
Blend chopped apple with 2 cups (480 ml) water until smooth. Gradually add this to vegetables in the large pot, stirring constantly. Bring to simmer and cook partially covered on medium low heat until vegetables are mostly soft, stirring regularly, 5–8 min.
In a bowl, whisk tomato paste, peanut butter, shoyu, dark soy sauce, lemon juice or rice vinegar, sake (if using), sugar, tamarind paste, salt, and 1/4 cup (60 ml) hot water.
Heat margarine in a small pot on medium low heat. Add flour and whisk until smooth. Cook, stirring constantly, 1–2 min.
Gradually pour whisked tomato mixture into the small pot with the flour mixture. Whisk until smooth. Return to simmer. Simmer on low, stirring constantly, for another 1–2 min.
Stir the thickened mixture into the large pot of vegetables. Return to simmer, stirring constantly.
Stir in green peas.
Return to simmer and continue to cook on low heat, stirring regularly, to desired consistency, adding some water and/or salt, as needed, 8–10 min. Remove from heat. Cover and let sit 10 min.
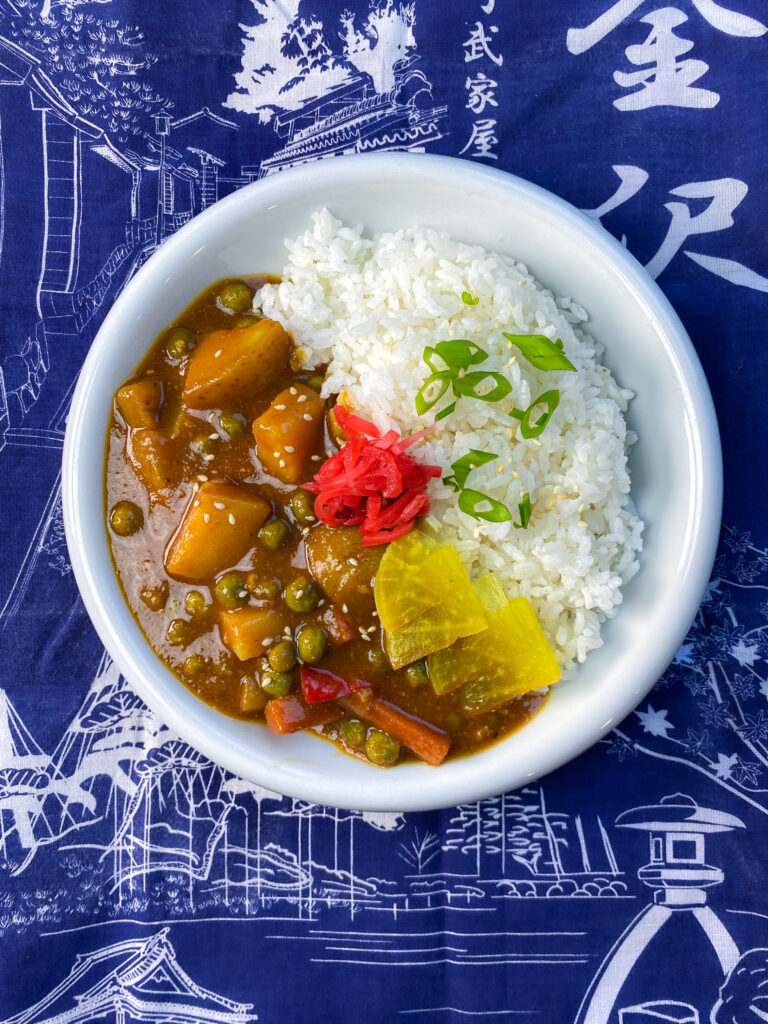
Portion on plates with Gohan steamed rice. Garnish with sliced Takuan and Benishoga.
Variations: Katsu Kare: Top curry with sliced Tofu Katsu (page 157) or Katsu (page 159).
Pflanzenöl in einem großen Topf auf mittlerer Flamme erhitzen.
Gewürfelte Zwiebel hinzufügen. Unter häufigem Rühren 5 bis 8 Min. braten, bis die Zwiebel weich wird.
Knoblauch, Ingwer, Curryblätter, Kreuzkümmel, Koriander, schwarzen Pfeffer, Kurkuma, Zimt, Lorbeerblätter, Kardamom und roten Chili (falls verwendet) hinzufügen und 2 bis 3 Min. anbraten.
Gewürfelte Kartoffeln und Möhre einrühren.
Halb abgedeckt 6 bis 8 Min. kochen, bis das Gemüse weicher wird. Bei Bedarf 1–2 EL Wasser zugeben.
Gehackten Apfel mit 2 Tassen (480 ml) Wasser im Mixer glatt pürieren. Zum Gemüse im Topf hinzufügen. Zum Kochen bringen und halb abgedeckt auf mittlerer Flamme 5 bis 8 Min. köcheln, bis das Gemüse weich ist, dabei regelmäßig umrühren.
In einer Schüssel Tomatenmark, Erdnussbutter, Shoyu, dunkle Sojasauce, Zitronensaft oder Reisessig, Sake (falls verwendet), Zucker, Tamarindenpaste, Salz und 1/4 Tasse (60 ml) warmes Wasser verquirlen.
Margarine in einem kleinen Topf auf mittlerer Flamme erhitzen. Mehl mit einem Schneebesen einrühren. 1 bis 2 Min. unter ständigem Rühren anbraten und glatt verrühren.
Die verquirlte Tomatenmischung nach und nach in die Mehlmischung einrühren und aufkochen lassen. Auf niedriger Flamme unter Rühren 1 bis 2 Min. köcheln lassen.
Die eingedickte Mischung unter das Gemüse rühren und wieder zum Kochen bringen.
Grüne Erbsen unterrühren.
Auf niedriger Flamme unter Rühren bis zur gewünschten Konsistenz 8 bis 12 Min. weiter köcheln. Nach Bedarf mehr Wasser und Salz einrühren. Vom Herd nehmen. Abdecken und 10 Min. stehen lassen.
Auf Tellern mit Gohan (gedämpftem Reis) portionieren. Mit gehacktem Takuan und Benishoga garnieren.
Variationen: Katsu Kare: Curry mit in Scheiben geschnittenem Tofu Katsu (Seite 157) oder Katsu (Seite 159) belegen.
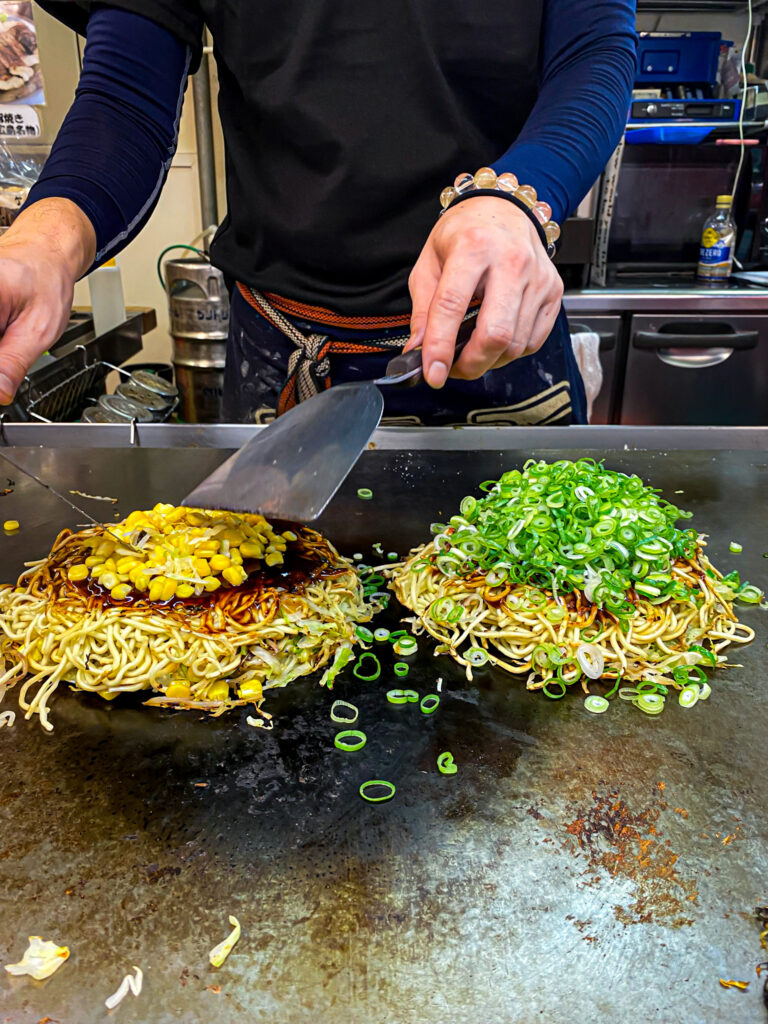
For the second year in a row, we were celebrating my birthday in Japan. I’d picked a place in Hiroshima which promised an unforgettable dinner: the legendary Okonomi-mura. But there are four floors of eateries from which to choose – a challenging task for any culinary explorer.
On the top floor, the spirited mood and menu of Roku beckoned. The chef confirmed this call with an enthusiastic wave of a shimmering spatula directing us to two stools at the bar. We joined the others facing the sizzling-hot, stainless-steel grill.
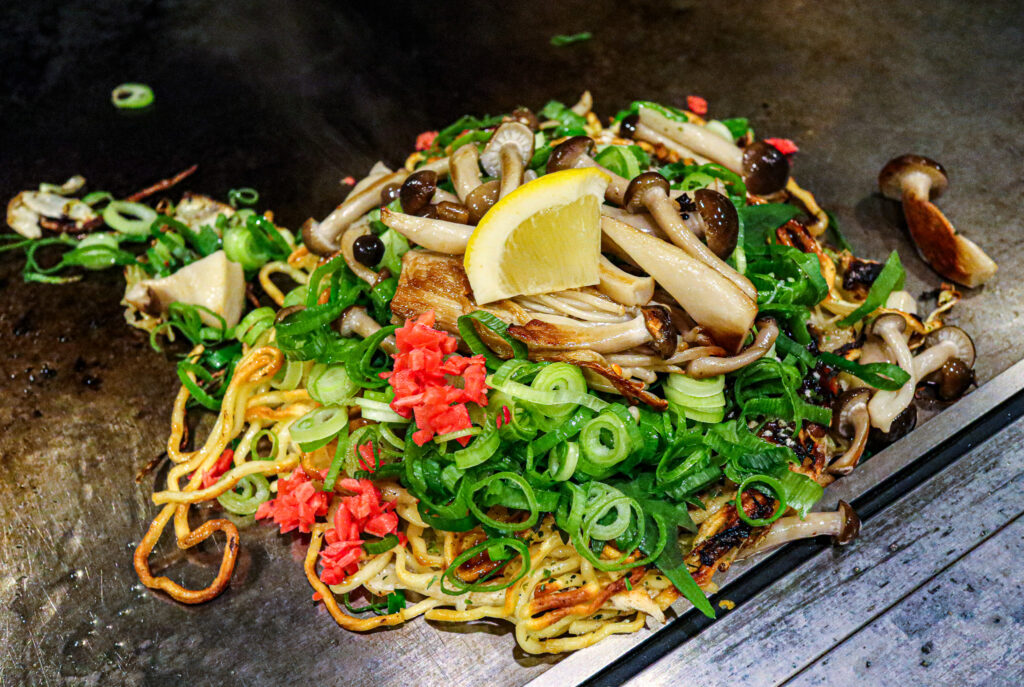
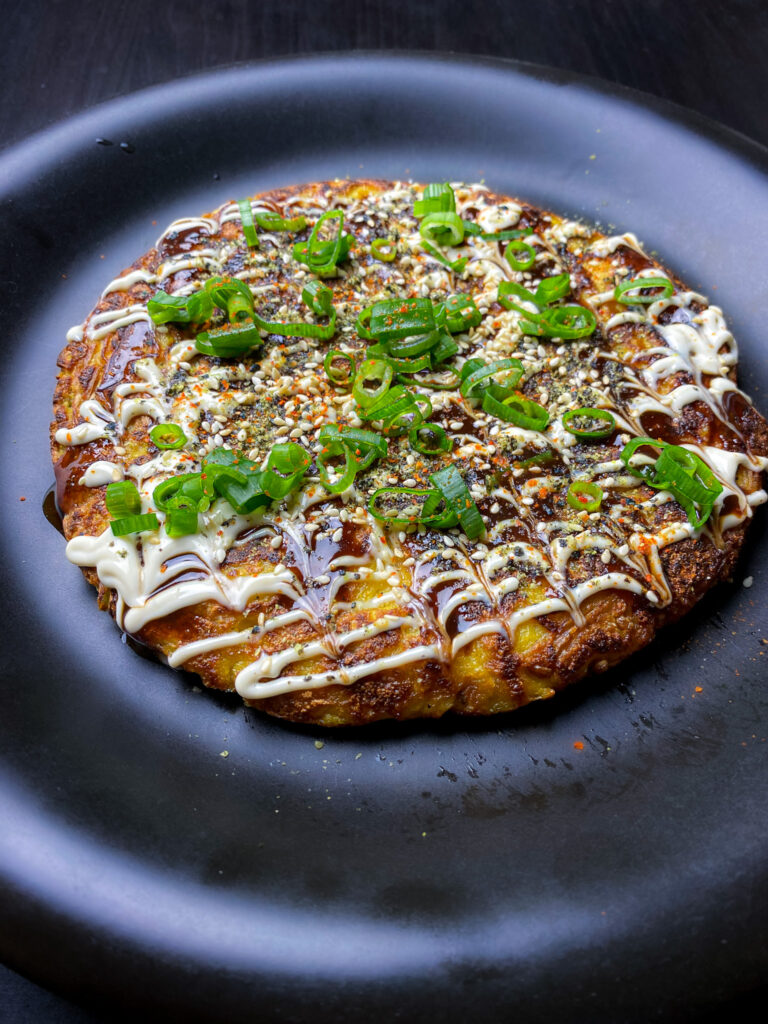
I’d already tried okonomiyaki in Tokyo, Kyoto and Osaka – they were absurdly delicious. But this was my first time in Hiroshima. We ordered the specialty of every eatery in the house: savory, grilled pancakes topped with a mountain of sizzling cabbage, steaming noodles, fried mushrooms, and sweet corn, garnished with green scallions, seasonings, and drizzled sauces.
The chef poured thin batter for two pancakes and grilled all of the ingredients in separate mounds, then stacked them up in layers on the pancakes, and flipped the stacks over. He grilled them some more, flipped them again, topped them with seasonings and sauce, and slid them over to us.
We ate them right off the hot grill, using small spatulas to chop off sloppy chunks that we moved to our mouths with chopsticks. It was heavenly. Even without candles, but with a song from the sake-choir – I was convinced that okonomiyaki is a great sub for birthday cake.
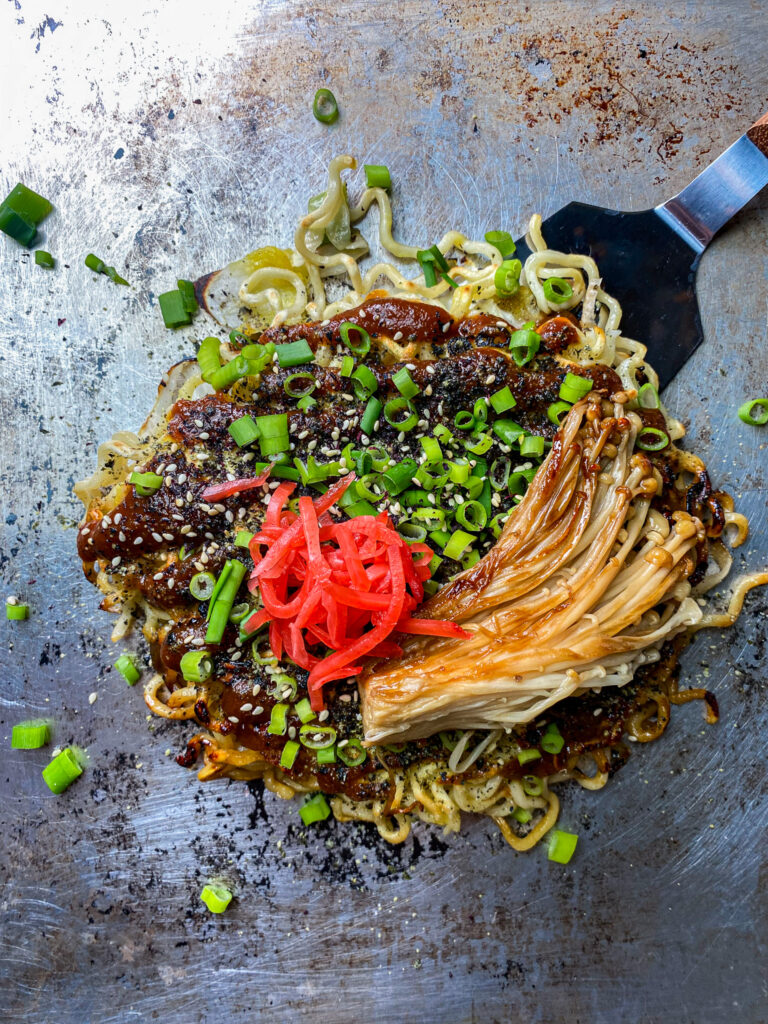
Okonomiyaki – Hiroshima-style grilled pancake with cabbage & noodles
2–3 medium (100 g) king oyster mushrooms or 2 cups (100 g) enoki mushrooms
batter:
1/2 cup (65 g) flour (all-purpose/ type 550)
1 Tbs (8 g) chickpea flour (besan)
1 Tbs (8 g) corn starch
1/4 tsp turmeric ground
1/2 tsp sea salt
1/4 tsp baking powder
2/3 cup (160 ml) Dashi (page 41) or 2/3 cup (160 ml) water + 1 tsp shoyu (soy sauce)
2 tsp vegetable oil
2–3 Tbs sesame oil for frying
for garnish:
4–6 Tbs Tonkatsu Sauce (page 49)
2–3 Tbs Furikake (page 45)
2–3 Tbs spring onion greens chopped
2–3 Tbs Benishoga pickled ginger (page 57)
2–3 tsp sesame seeds lightly roasted
Cover quick-cooking noodles with boiling water in a pot. Cover and let sit for 10 min. Drain well.
Shred or chop cabbage into thin strips with a mandolin or a large, sharp knife.
If using king oyster mushrooms, cut into slices about 1/4 in (6 mm) thick. If using enoki mushrooms, separate into two or three bunches, removing and discarding tough ends.
Combine flour, chickpea flour, corn starch, ground turmeric, salt, and baking powder in a large mixing bowl. Add Dashi or water+ soy sauce, and vegetable oil. Whisk mostly smooth. Do not overmix.
Heat a small frying pan on medium heat. Drizzle 2 tsp sesame oil in the pan.
Pour about 1/4 cup batter in the center of the hot pan. Tilt the pan so the batter spreads out in a circle.
Spread a layer of shredded or chopped cabbage generously over the pancake. Arrange a large handful of drained noodles on top of the cabbage. Press down on noodles lightly with a spatula.
Drizzle another 1/4 cup batter over the noodles and cabbage. Cover and cook until cabbage begins to soften, 3–5 min. Occasionally lift up the edges of the pancake with a spatula to check that it’s not burning. Adjust heat accordingly.
With a large spatula, carefully turn the pancake over. Drizzle another 2 tsp sesame oil in the pan around the pancake and tilt to spread the oil. Press down lightly again with the spatula. Cover and cook until the pancake is mostly firm, another 3–5 min. Transfer the Okonomiyaki to a plate. Repeat for remaining Okonomiyaki.
Add a drizzle of sesame oil to the hot pan. Fry mushrooms until browned on both sides, about 3–5 min.
Spread a layer of Tonkatsu Sauce generously on the cooked Okonomiyaki. Garnish generously with Furikake. Arrange fried mushrooms on top. Garnish with spring onion greens, Benishoga, and roasted sesame seeds. Serve.
Variations: Mushrooms: Substitute white or brown mushrooms for king oyster or enoki mushrooms.
Okonomiyaki auf vier Etagen Hiroshima. 08/2024
Das zweite Jahr in Folge feierten wir meinen Geburtstag in Japan. In Hiroshima hatte ich einen Ort ausgesucht, der ein unvergessliches Abendessen versprach: das legendäre Okonomi-mura. Allerdings gibt es dort Lokale auf vier Etagen, aus denen man wählen kann – eine Herausforderung für den kulinarischen Entdeckungsreisenden.
Im obersten Geschoss lockten die lebhafte Stimmung und die Speisekarte des Roku. Der Koch bekräftigte diese Wahl mit dem begeisterten Wink seines glänzenden Pfannenwenders, mit dem er auf zwei Plätze an der Bar deutete.
Wir setzten uns zwischen die anderen Gäste, den zischend heißen Edelstahl-Grill direkt vor uns.
Ich hatte Okonomiyaki bereits in Tokyo, Kyoto und Osaka probiert – sie waren unfassbar köstlich. Dies war nun das erste Mal in Hiroshima. Wir bestellten die Spezialität des Hauses: pikante gegrillte Pfannkuchen mit einem Berg zischenden Krauts, dampfenden Nudeln, gebratenen Pilzen und Mais, garniert mit grünen Frühlingszwiebeln, Gewürzen und Saucen.
Der Koch goss den Teig für zwei Pfannkuchen auf den Grill vor uns und briet daneben die einzelnen Zutaten, die er dann in Schichten auf die Pfannkuchen türmte. Diese Stapel drehte er schließlich um und grillte sie weiter, drehte sie abermals um, garnierte die fertigen Okonomiyaki mit Gewürzen und Sauce und schob sie zu uns hinüber.
Wir aßen sie direkt vom heißen Grill, indem wir mit kleinen Spateln grobe Stücke abtrennten und diese mit Stäbchen zu unseren Mündern führten. Es war himmlisch.
Auch ohne Kerzen, dafür mit dem Happy-Birthday-Gesang der Gäste, war Okonomiyaki ein großartiger Geburtstagskuchen für mich.
Okonomiyaki – Hiroshima-style gegrillter Pfannkuchen mit Weißkohl & Nudeln
2/3 Tasse (160 ml) Dashi (Seite 41) oder 2/3 Tasse (160 ml) Wasser + 1 TL Shoyu (Sojasauce)
2 TL Pflanzenöl
2–3 EL Sesamöl zum Braten
zum Garnieren:
4–6 EL Tonkatsu Sauce (Seite 49)
2–3 EL Furikake (Seite 45)
2–3 EL Frühlingszwiebelgrün gehackt
2–3 EL Benishoga eingelegter Ingwer (Seite 57)
2–3 TL Sesamsamen leicht geröstet
Quick-Cooking-Nudeln in einem Topf mit kochendem Wasser bedecken. Abdecken und 10 Min. stehen lassen. Nudeln gut abtropfen lassen und beiseite stellen.
Weißkohl raspeln oder mit einer Mandoline oder einem großen, scharfen Messer in sehr dünne Streifen schneiden.
Kräuterseitlinge in ca. 6 mm dicke Scheiben schneiden bzw. den rauen Stielansatz der Enoki-Pilze abschneiden und die Pilze in 2–3 Bündel teilen.
Mehl, Kichererbsenmehl, Speisestärke, Kurkuma, Salz und Backpulver in einer Rührschüssel vermengen. Dashi (oder Wasser + Sojasauce) und Pflanzenöl hinzufügen. Mit einem Schneebesen glatt rühren.
Eine kleine Bratpfanne auf mittlerer Flamme erhitzen. 2 TL Sesamöl in die Pfanne träufeln.
1/4 Tasse Teig in die heiße Pfanne gießen. Die Pfanne kippen, sodass sich der Teig kreisförmig verteilt.
Eine Schicht geraspelten oder geschnittenen Weißkohl großzügig auf dem Pfannkuchen verteilen. Eine Handvoll abgetropfter Nudeln auf dem Weißkohl anrichten und mit einem Spatel leicht andrücken.
Noch 1/4 Tasse Teig über Nudeln und Weißkohl träufeln. Abdecken und 3 bis 5 Min. braten, bis der Kohl anfängt, weich zu werden. Gelegentlich die Ränder des Pfannkuchens mit einem Pfannenwender anheben, um zu prüfen, dass er nicht anbrennt. Flamme dementsprechend anpassen.
Den Pfannkuchen mit einem großen Pfannenwender vorsichtig wenden. Um den Pfannkuchen herum noch 2 TL Sesamöl in die Pfanne träufeln und diese kippen, um das Öl zu verteilen. Nochmals leicht andrücken. Abdecken und weitere 3 bis 5 Min. braten, bis der Pfannkuchen fest ist. Okonomiyaki auf einen Teller geben. Den Vorgang für weitere Okonomiyaki wiederholen.
Etwas Sesamöl in die heiße Pfanne träufeln. Pilze 3 bis 5 Min. braten, bis sie weich und angebräunt sind.
Tonkatsu Sauce großzügig auf die Okonomiyaki verteilen. Mit Furikake bestreuen. Gebratene Pilze darauf anrichten. Mit Frühlingszwiebelgrün, Benishoga und Sesamsamen garnieren. Servieren.
Variationen: Champignons: Kräuterseitlinge oder Enoki-Pilze durch weiße oder braune Champignons ersetzen.
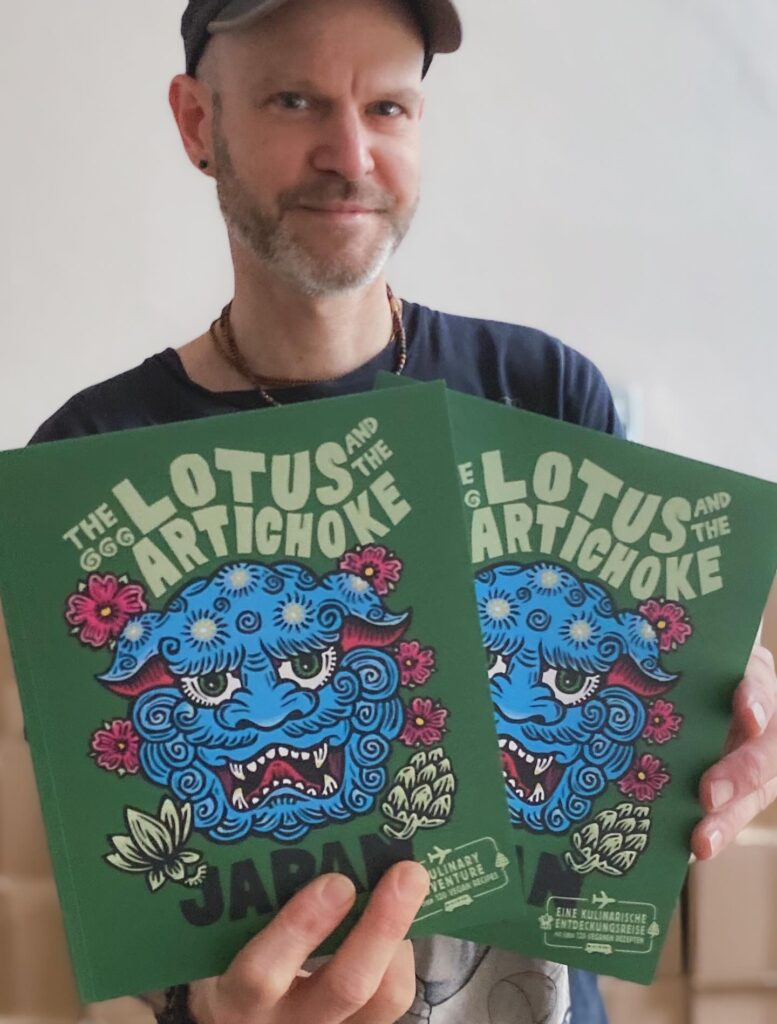
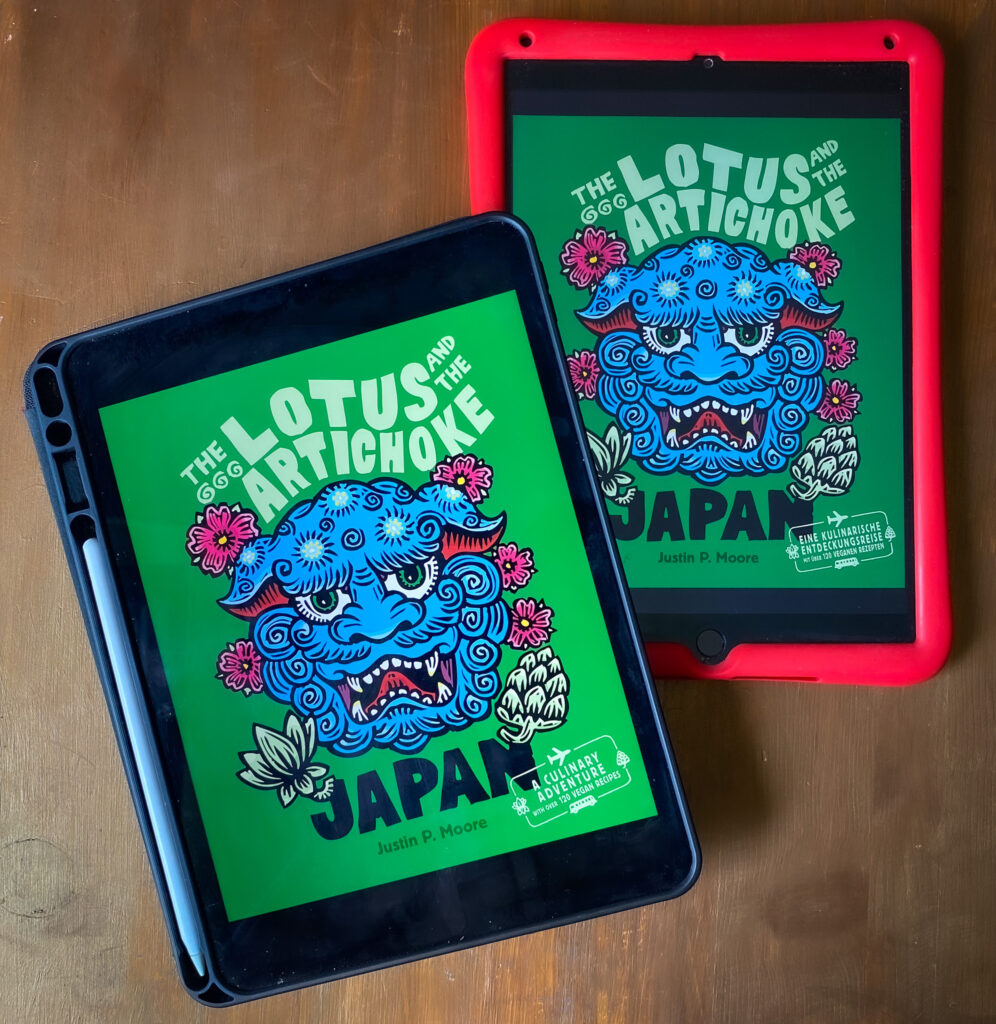
Order a signed copy of The Lotus and the Artichoke – JAPAN (in English🇺🇸 or German🇩🇪) … which also includes a sticker/bookmark set & immediate download of the e-book!
The Lotus and the Artichoke – JAPAN
My 8th cookbook of vegan recipes inspired by my travels, stays with families, and cooking in the kitchens of homes and restaurants worldwide
based on 4 visits to Japan – and adventures in 50+ other countries
224 pages with 120+ vegan recipes and over 90 full-page color photographs
packed full of quick eats, appetizers, mini-dishes, salads, soups, street food, soulful breakfasts, boxed lunches, delicious dinners, memorable set meals, fantastic feasts, and delightful desserts
travel stories from my international adventures & experiences
compact, no-nonsense, easy-to-follow recipes designed to satisfy and impress eaters of all ages, tastes, and minds
created for cooks of all levels, from beginner to advanced
recipes feature easy-to-find ingredients
lots of variations for simplification & substitutions
extensively tested & approved by cooks, foodies, friends, families, and hungry recipe testers in over 25 countries
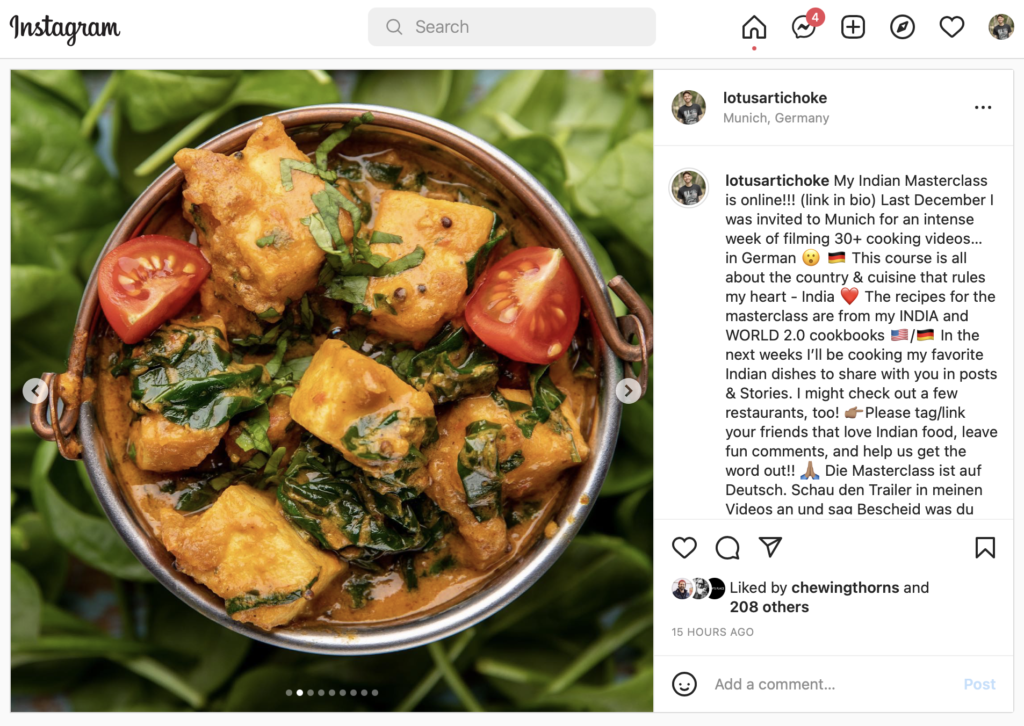
In December 2021 I was invited to go to Munich for a week of intense filming with the incredible Vegan Masterclass team. We filmed over 30 videos dedicated to my favorite country & cuisine – INDIA!
…and now I can share with you my passion and experience. Currently the entire course is in German, but I’ll be posting lots of content (especially on Instagram but also new recipes, photos, and videos here) in English.
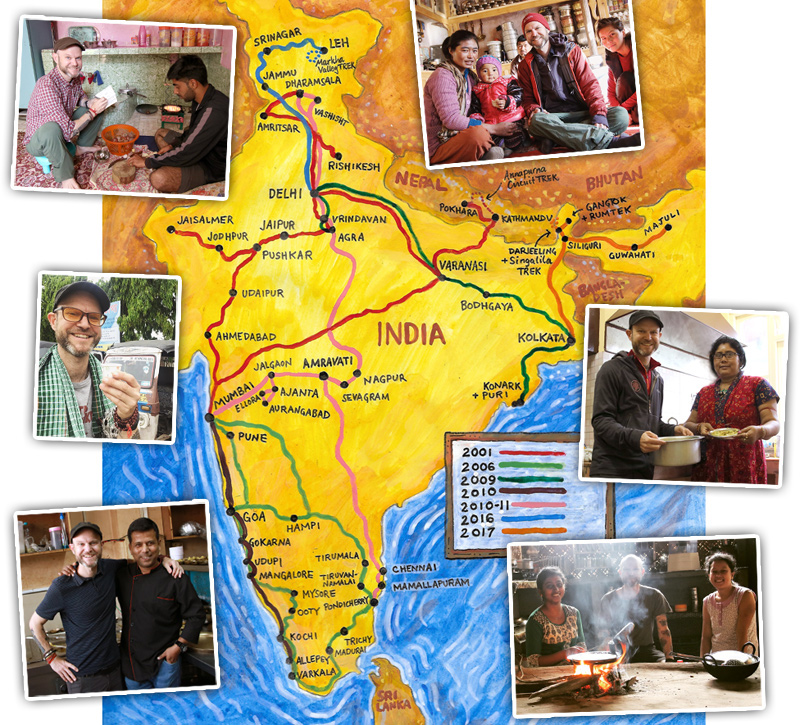
Although I’ve been cooking Indian food for almost 30 years and speaking German for over 20, making this Masterclass was one of the most challenging (and rewarding) experiences in my life and career. I’d rank it right up there with the adventure of living and working in Amravati (Maharashtra) India for a year, teaching Art and English at an international school. It was definitely a peak achievement which puts a shiny crown on my move to Berlin, Germany in September 2001, and the 8 months of German language courses!
I’d like to dedicate this Indian Masterclass to all of the generous and brilliant friends, families, and masters of Indian cooking that have inspired me and led me on my own journey of discovery and delights. In my ten trips to India I have spent countless hours in kitchens of homes and restaurants, at street food vendors, and devoured unforgettable meals in every corner of the subcontinent. I’ve learnt so much, but I’m always still learning — and never shy to share my appreciation, love, and excitement.
(I’ve been back to India twice since I made this graphic… in 2018 and 2019 with my family!)
In my cookbooks and in the Indian Masterclass video series, I talk a lot about the individuals that have guided and inspired me, and there are many (wacky and wild) stories from my journals about my adventures – in the kitchen and beyond.
This course dives deep into the theory and magic of (mostly) North and South Indian cooking, but we must remember that these are very broad and general strokes attempting to classify and unimaginable breadth of different cuisines, techniques, traditions, and ideas. India offers an incredible wealth and diversity of foods and culinary ways, and many are underrepresented in cookbooks and courses. I hope to expand this Masterclass series in the future to include many other Indian cuisines, including Northeastern and more specific subcategories of Northern, Southern, and West Indian traditions.
I also address the concept of authenticity and ownership in my cookbooks, but it’s necessary for me to drop a few lines here, too: You can’t really cross the street or turn around in India without a new voice challenging the authenticity and correctness of any particular dish or spice mix. Debates on what does or does not belong in a dish, or which shape something must be, are very common and all part of the regional, community, family traditions, woven intricately into the cultural fabric, history, and interpretations. I will never claim to know all the secrets or have the most ‘authentic‘ recipe for anything, whether Indian cooking or otherwise. My recipes are the result of my very best efforts to repeat and reflect the traditions and culinary wonder shared with me. I always encourage you to explore and learn deeper and focus on appreciation and enjoyment.
Outside India it is not always possible to stay absolutely true to ingredients and methods as I’ve learned them, but I always try to address adaptations and modifications meant to render the recipes more accessible and practical on other continents and for a variety of audiences and cooks of all skill levels.
I promise you that my cookbooks and this Masterclass will offer you – and your loved ones – some of the most thorough, heartfelt, and sincere explorations of Indian cooking you’re likely to find outside of India. I’m always open to feedback and would love to hear your thoughts!
Here are some preview and promotional videos and photos from the course and also the obligatory (German) marketing text fun! :-)
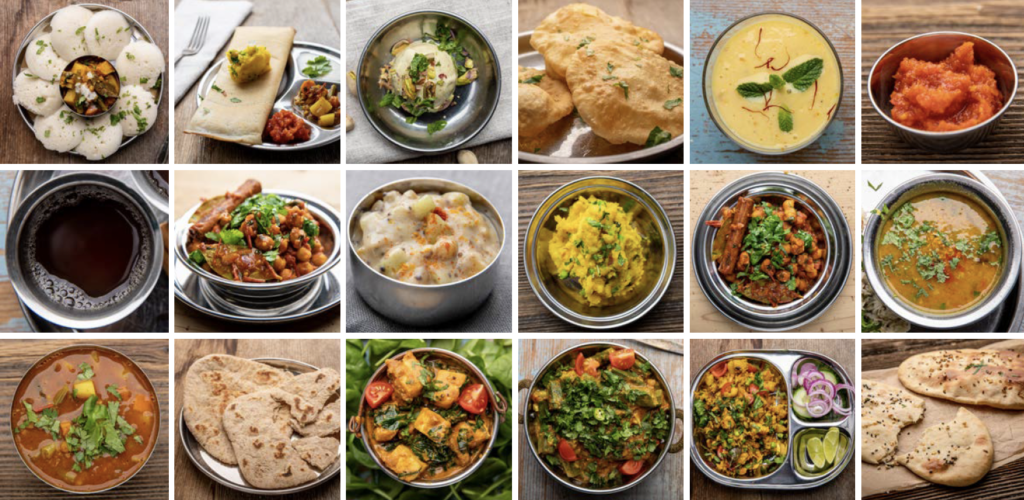
Die indische Küche ist ein Traum für Gemüsefans! Sie überrascht mit einer Vielfalt an Geschmacksrichtungen, Aromen und Gewürzen. Traditionelle Köstlichkeiten aus der süd- und nordindischen Küche.
Egal ob herzhafte Fladenbrote wie Chapati oder Naan, oder aromatische Currys wie Chana Masala oder Palak Paneer – lass dich überraschen von der Raffinesse, den duftenden Gewürzkombinationen und den regionalen Delikatessen. Indien bietet ein Schatz voller Köstlichkeiten!
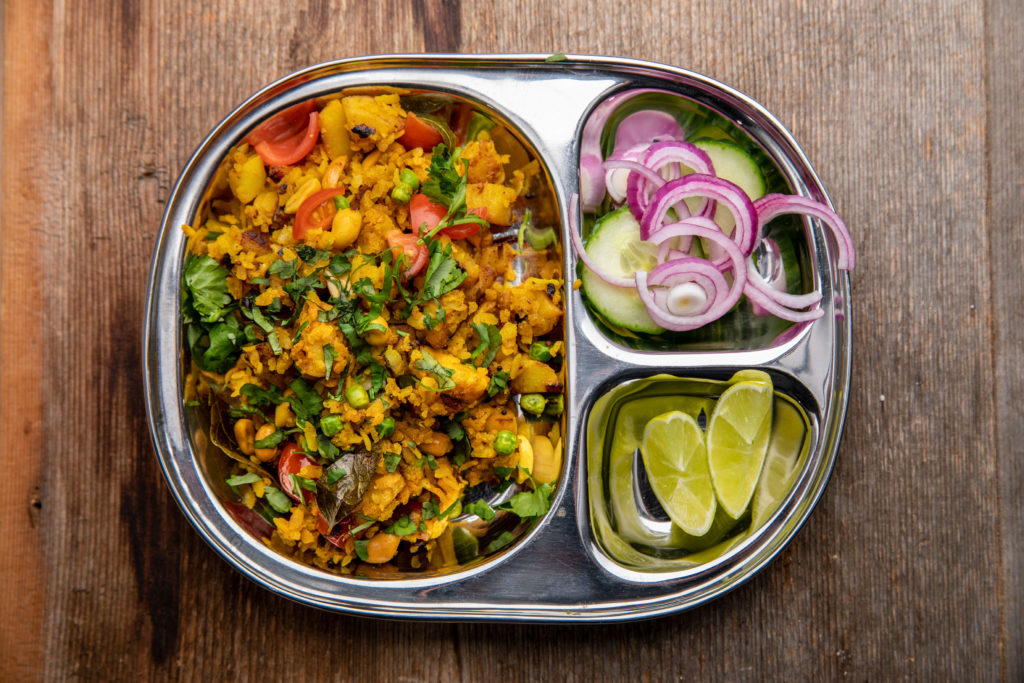
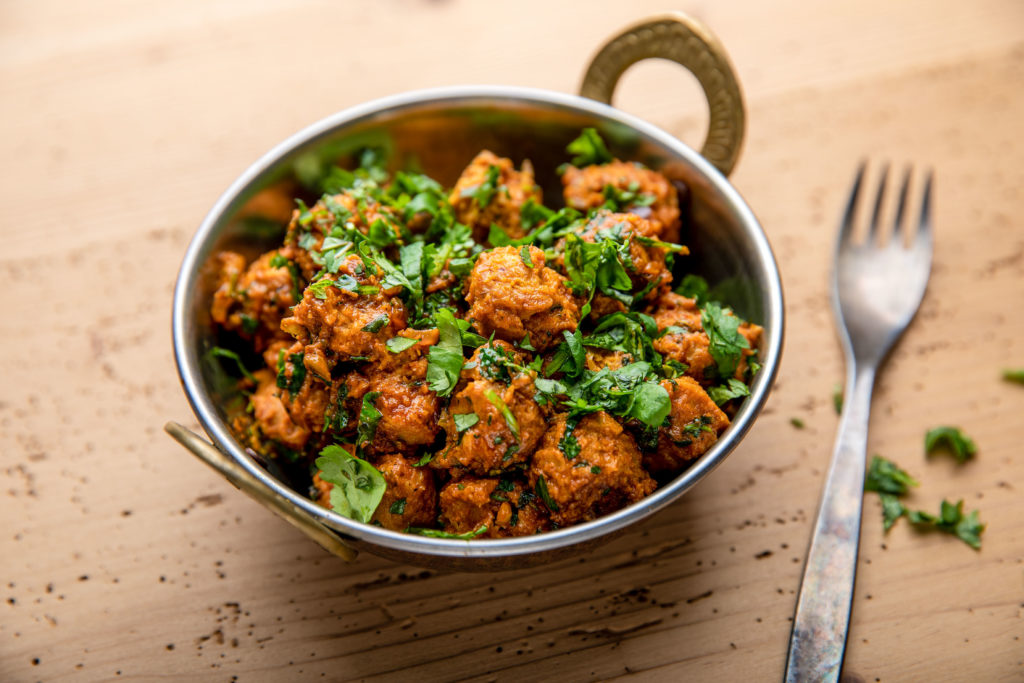
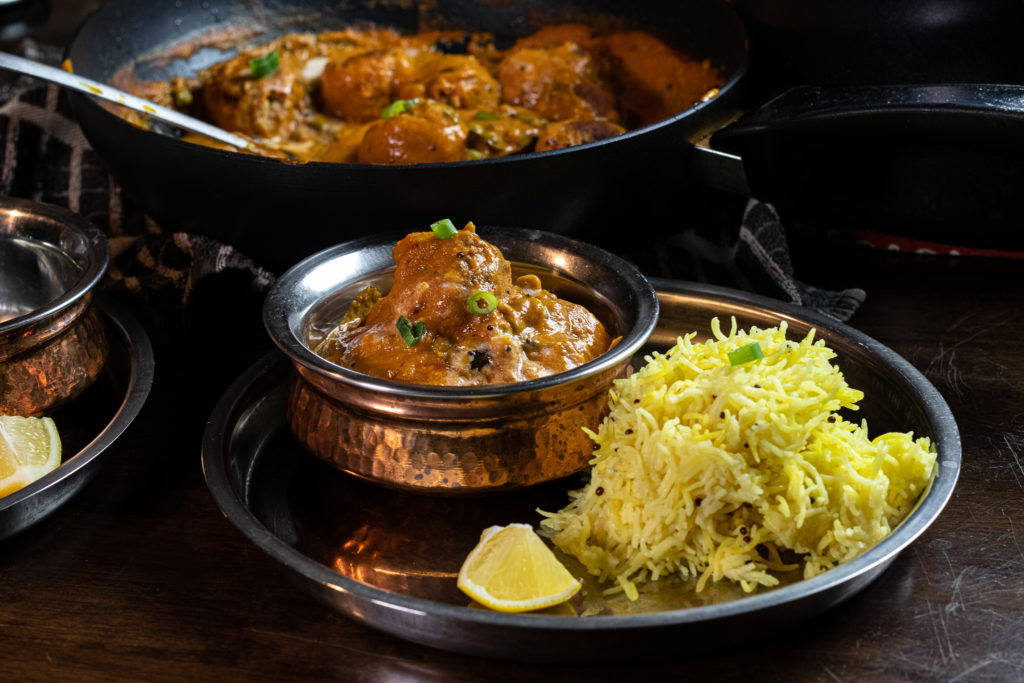
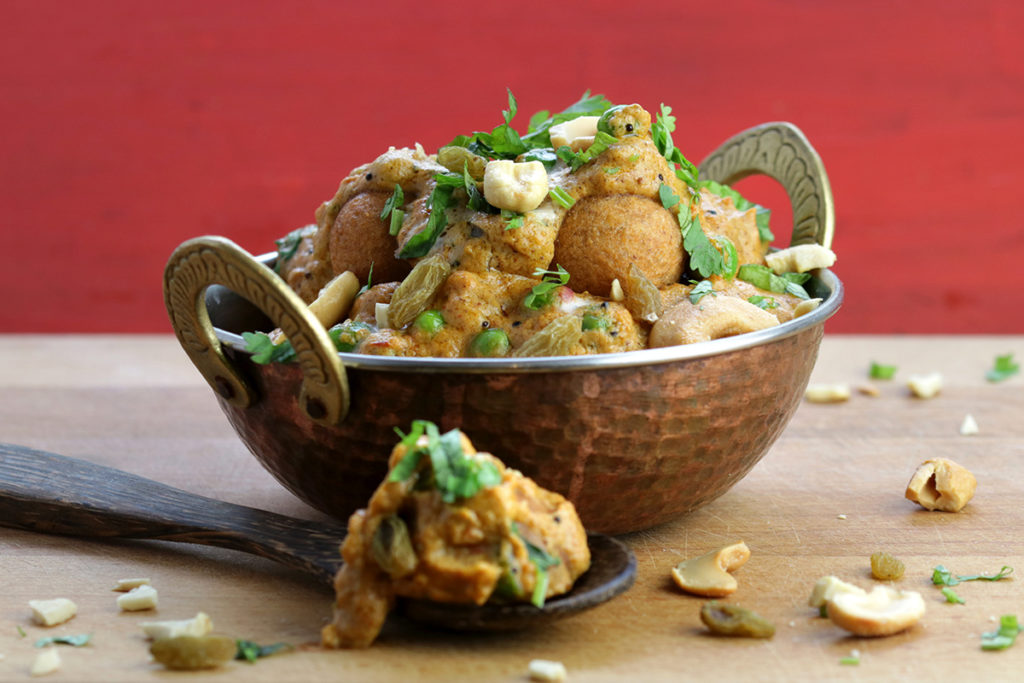
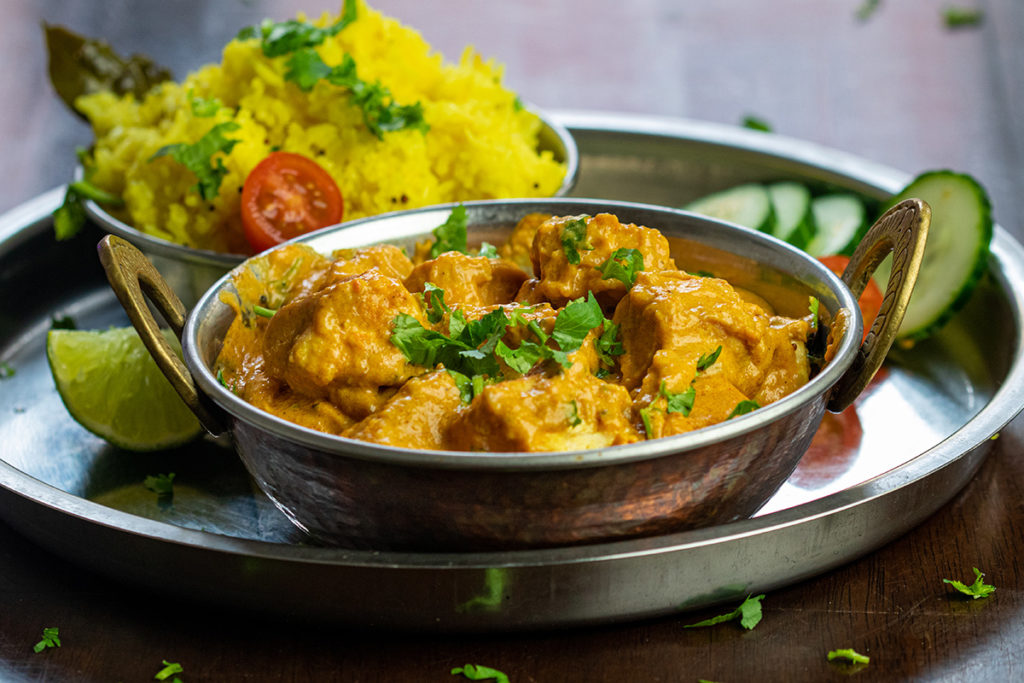
To celebrate the launch of my Indian Masterclass, last night I cooked Malai Kofta for the family! It’s one of my favorite recipes from my INDIA cookbook!
Soak cashews in hot water 20 min. Drain and discard water. Blend soaked cashews with 1 1/4 cup (300 ml) fresh water and lemon juice until smooth, 60–90 sec. Transfer to bowl. Set aside.
Cover potatoes with water in a medium pot. Bring to boil. Cook until soft, 20–25 min. Rinse in cold water. Remove, discard peels. Mash potatoes in a large bowl. Add 2 Tbs blended cashew cream, chickpea flour, bread crumbs, corn starch, ground cumin, garam masala, and salt. Mix well.
Heat oil about 2 in (5 cm) deep in small pot on medium high heat. Oil is hot enough when a small piece of batter sizzles and comes to surface immediately.
Wet hands and form walnut-sized balls from the batter. Carefully add 4 to 6 balls to hot oil. Fry until golden brown, turning often, 3–5 min. If balls turn brown immediately or oil is smoking, reduce heat. If they don’t sizzle and darken in 2 min, increase heat slightly. Using a slotted spoon, drain and transfer fried dumplings to a plate. Continue for all balls.
Blend chopped tomatoes and 1 1/4 cup (300 ml) water until mostly smooth.
Heat 2 Tbs oil in a large pot or wok on medium heat. Add mustard seeds. After they start to pop (20–30 sec), add chopped onion, garlic, ginger, ground cumin, coriander, garam masala, red chili powder (or paprika), bay leaves, cinnamon, and cardamom. Fry until onions soften, stirring constantly, 3–5 min.
Add blended tomatoes. Bring to boil. Simmer until sauce darkens, stirring regularly, 10–12 min.
Stir in blended cashew cream, turmeric, salt, and sugar (or agave syrup). Continue to simmer, stirring regularly, until sauce thickens and oil begins to separate from sauce another 7–10 min.
Stir in fried dumplings, peas, and raisins. Simmer on medium low, partially covered, stirring occasionally, 3–5 min. Remove from heat.
Garnish with chopped coriander leaves and serve with rice, roti, or naan.
Malai Kofta nordindische Kartoffelbällchen in cremigem Tomaten-Curry
Cashewkerne 20 Min. in heißem Wasser einweichen. Abgießen und Einweichwasser wegschütten. Eingeweichte Cashewkerne mit 1 1/4 Tasse (300 ml) frischem Wasser und Zitronensaft 60 bis 90 Sek. im Mixer glatt pürieren. In eine Schüssel geben und beiseite stellen.
Kartoffeln in einen Topf geben und mit Wasser bedecken. Zum Kochen bringen und 20 bis 25 Min. weichkochen. Abgießen, mit kaltem Wasser abschrecken und schälen. In eine große Schüssel geben und zerdrücken. 2 EL der Cashewcreme, Kichererbsenmehl, Semmelbrösel, Speisestärke, gemahlenen Kreuzkümmel, Garam Masala und Salz hinzufügen und alles gut vermischen.
Öl 5 cm hoch in einen kleinen Topf geben und auf mittlerer Flamme erhitzen. Das Öl ist heiß genug, wenn eine kleine Menge Teig nach dem Hineingeben brutzelt und an die Oberfläche steigt.
Hände befeuchten und aus der Kartoffelmischung walnussgroße Bällchen formen. Vorsichtig 4 bis 6 Bällchen ins heiße Öl geben. 3 bis 5 Min. unter häufigem Wenden goldbraun frittieren. Werden die Bällchen sofort dunkel oder raucht das Öl, die Hitze reduzieren. Wenn sie nicht brutzeln und nicht innerhalb von 2 Min. bräunen, Flamme höherstellen. Bällchen mit einem Schaumlöffel herausheben, abtropfen lassen und auf einen Teller legen. Restliche Kofta frittieren.
Gehackte Tomaten und 1 1/4 Tasse (300 ml) Wasser fast glatt pürieren.
In einem großen Topf oder Wok 2 El Öl auf mittlerer Flamme erhitzen. Senfsamen hineingeben. Nach deren Aufplatzen (20 bis 30 Sek.) gehackte Zwiebel, Knoblauch, Ingwer, gemahlenen Kreuzkümmel, Koriander, Garam Masala, Chilipulver (oder Paprikapulver), Lorbeerblätter, Zimt und Kardamom hinzufügen. 3 bis 5 Min. unter ständigem Rühren rösten, bis die Zwiebel weich ist.
Tomatenmix zugießen und zum Kochen bringen. Flamme herunterstellen und 10 bis 12 Min. unter regelmäßigem Rühren köcheln, bis die Soße dunkler wird.
Cashewcreme, Kurkuma, Salz und Zucker (oder Agavensirup) einrühren. Weitere 7 bis 10 Min. unter regelmäßigem Rühren köcheln, bis die Soße eindickt.
Kartoffelbällchen, Erbsen und Sultaninen hineingeben. 3 bis 5 Min. halb abgedeckt auf niedriger Flamme unter gelegentlichem Rühren köcheln. Vom Herd nehmen.
Mit gehacktem Koriandergrün garnieren und mit Reis, Roti oder Naan servieren.
Sometimes it’s hard to believe, but I’ve been making vegan French Toast for over thirty years. My earliest attempts were back when I was a newbie teenage vegan, back in the early ’90s. In fact, there was a recipe for French Toast in Solace Kitchenzine, a cut & pasted, photocopied old-school fanzine with a collection of vegan recipes that I self-published when I was only 17 years old.
I only ever made 500 copies of Solace Kitchenzine, it only had about 20 recipes (and a lot of my drawings and black and white photographs) – but I sold, traded, and distributed all of them – at hardcore punk / straightedge shows, at high school in the New Jersey suburbs, and (mostly) in the domestic and international post. I mailed them out all over the world to other kids that collected ‘zines.
I’ve actually only got a few more copies of my ‘zines. It’s fun to pull them out, put one of my few remaining Gorilla Biscuits or Youth of Today 12″ records on the turntable… and think amusingly about the old days.
The recipe has come a long way since the 1990s. I’ve got decades more cooking experience and a lot more tricks in my culinary arsenal. Instead of just chickpea flour (which Indians have been using for egg-like dishes for ages, and I learned to use like a boss while living in India) I also like to use corn starch or (freshly) ground flax seeds in the batter – to help bind it. I also typically include some Kala Namak, Indian black salt, for that characteristic egg flavor.
As noted, stale bread is best for French Toast. I’ll usually leave the bread slices out the night before I want to make this. Or just use bread that’s been hanging out in the kitchen for a while.
Depending what I’ve got around and how motivated I’m feeling, I may or may not use ground nutmeg, or add some ground vanilla (or vanilla extract), but it does make things more fun. Back in the old days I liked to use Vanilla Edensoy or Vitasoy soy milk (there weren’t 50 brands of plant-based milks at the supermarket or health food stores decades ago).
I originally learned to make French Toast from my dad, who often made breakfast for the family on the weekends. (I also learned to make pancakes and scrambled eggs from him – all of these things I’ve been making vegan for literally most of my life now.) Btw, vegan recipes for Pancakes and Tofu Scramble are in The Lotus and the Artichoke – WORLD 2.0, if you need more vegan brunch ideas.
Yes, lots of recipes are on this website for free, but I’ll just say that when you download my e-books and order my printed cookbooks, it really brightens my days – and helps keep this project going – and puts food on the table for my family here in Berlin. ;-)
Top your fried toast slices with some fresh fruit and a decent syrup of your choice. I think maple syrup is best, but agave syrup or blackstrap molasses are also fun. And, powdered sugaralways makes French Toast extra special.
2 Tbs chickpea flour or wheat flour (all-purpose / type 550)
2 Tbs corn starch or 2 Tbs flax seeds ground
1 Tbs sugar
1/2 tsp baking powder
1/2 tsp cinnamon
1/8 tsp nutmeg
1/8 tsp turmeric ground
1/4 tsp sea salt
1/4 tsp kala namak optional
1 cup (240 ml) soy milk
1 Tbs vegetable oil more as needed
toppings:
fresh fruit (e.g. sliced banana, pineapple, mango, or berries)
margarine
powdered sugar, syrup, or fruit jam
Combine chickpea flour (or flour), corn starch (or ground flax seeds), sugar, baking powder, ground cinnamon, nutmeg, turmeric, salt, and kala namak (if using) in a large bowl.
Whisk in soy milk and oil. Mix until mostly smooth, but don’t overdo it. Let sit 10 min.
Heat a large non-stick frying pan on medium to medium high heat. When a drop of water sizzles and dances on the surface, the pan is hot enough. (If not using a non-stick frying pan, rub a few drops of oil over the surface with a paper towel before frying each slice.)
Dip a slice of bread in batter on both sides. Let it soak for a few seconds, then transfer it to the hot pan. Repeat for another slice or two. Fry slices on each side for 3–4 minutes until deep golden brown, turning carefully with a spatula. If slices are sticking to the pan, add a few drops of oil or some margarine around the slices before turning. Transfer cooked slices to a plate and cover. Continue for remaining slices.
Serve with fresh fruit, margarine, powdered sugar, syrup, and/or jam.
Variations:
Orange: Add 2 tsp orange zest to batter. Vanilla: Add 1/4 tsp ground vanilla or 1 tsp vanilla sugar to batter. Chocolate: Use chocolate soy milk or add 1 Tbs cocoa powder to batter. Adjust soy milk accordingly.
frisches Obst (z. B. Bananen-, Ananas- oder Mangoscheiben oder Beeren)
Margarine
Puderzucker, Sirup oder Marmelade
In einer Rührschüssel Kichererbsenmehl oder Mehl, Stärke oder Leinsamen, Zucker, Backpulver, Zimt, Muskat, Kurkuma, Salz und Kala Namak (falls verwendet) vermischen.
Sojamilch und Öl unterrühren, bis ein glatter Teig entsteht. Nicht zu stark verrühren. 10 Min. ruhen lassen.
Eine große beschichtete Pfanne auf mittlerer Flamme erhitzen. Wenn ein Tropfen Wasser zischend auf der Oberfläche herumhüpft, hat die Pfanne die richtige Temperatur. (Beim Verwenden einer unbeschichteten Pfanne vor dem Braten jeder Scheibe ein paar Tropfen Öl hineingeben und mit Küchenpapier verreiben.)
Brotscheibe beidseitig ein paar Sekunden lang in den Teig tauchen. In die heiße Pfanne geben und auch die zweite (und ggf. dritte) Scheibe mit dem Teig überziehen. Die Scheiben auf jeder Seite 3 bis 4 Min. goldbraun braten. Vorsichtig mit einem Pfannenwender umdrehen. Wenn die Scheiben anhaften, vor dem Wenden einige Tropfen Öl oder etwas Margarine außen um den Rand der Scheiben verteilen. Fertige Scheiben auf einen Teller legen und abkühlen lassen. Restliche Scheiben ausbacken.
Mit frischem Obst, Margarine, Puderzucker, Sirup und/oder Marmelade servieren.
Variationen:
Orange: 2 TL geriebene Orangenschale unter den Teig mischen. Vanille: 1/4 TL Vanillepulver oder 1 TL Vanillezucker einrühren. Schokoladig: Schoko-Sojamilch verwenden oder 1 EL Kakaopulver unter den Teig mischen. Die Sojamilchmenge entsprechend anpassen.
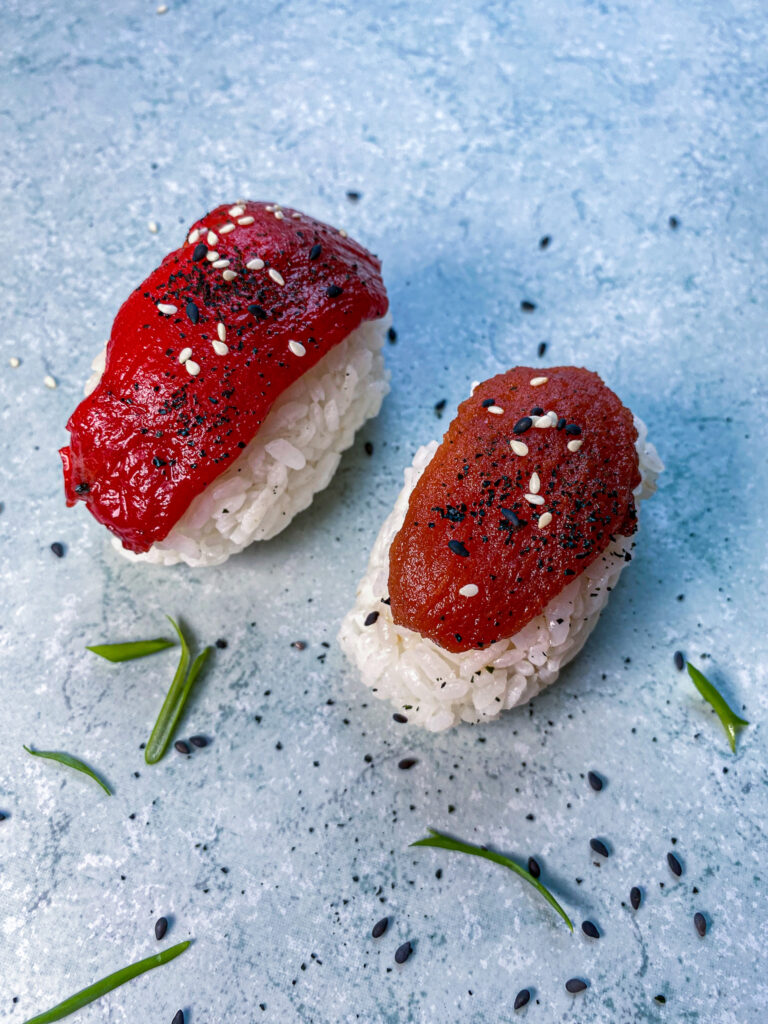
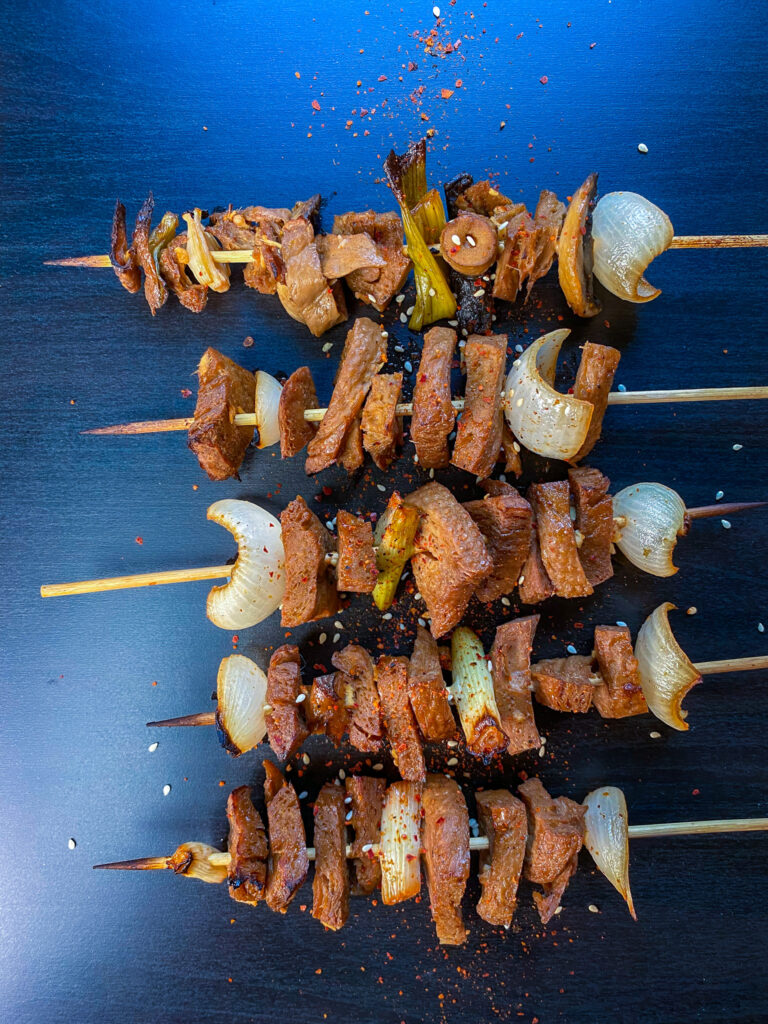
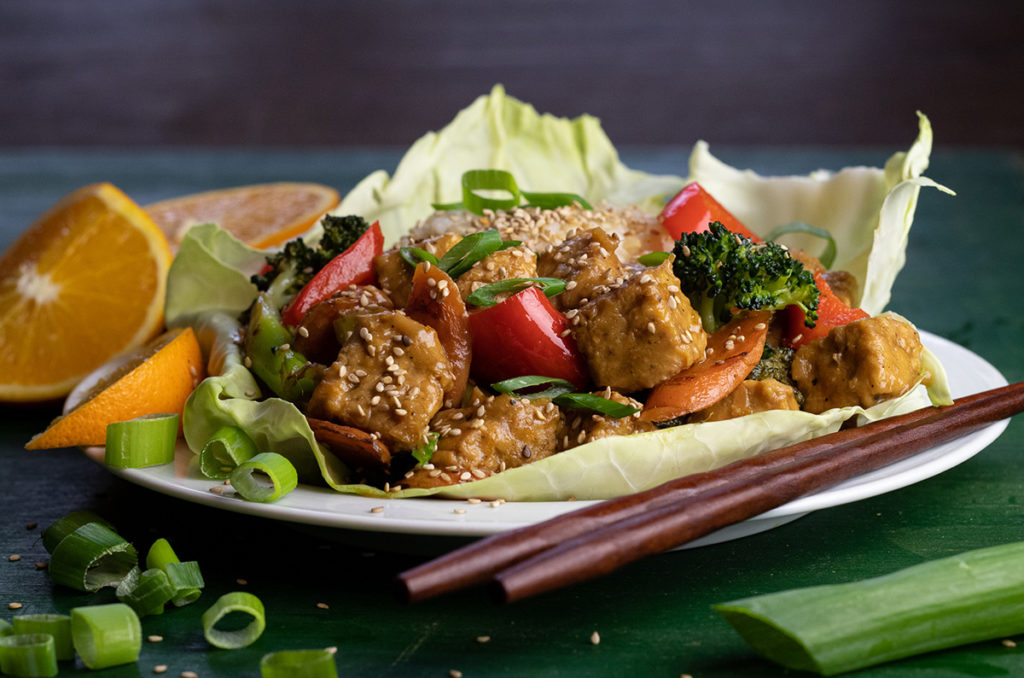
This a Japanese-inspired dish I’ve been making for a long time. I’ve cooked it for many dinner parties, and it’s big hit with my family – and a favorite of many of my recipe testers. The recipe for Orange Tempeh Teriyaki first appeared in my original cookbook of travel-inspired recipes, The Lotus and the Artichoke – Vegan Recipes from World Adventures. When I re-did the cookbook for the WORLD 2.0edition I upgraded the recipe and reshot the photo, too.
You can make this teriyaki dish with tofu cubes or chopped seitan instead of tempeh – and apple juice also works well in place of orange juice – if you want less citrus flavor. I often amp up the spices and add freshly ground coriander and Szechuan pepper. If you like it spicy, you can also add more chopped fresh, red chillies along with the chopped onions, ginger, and garlic.
As for the origins and early inspiration for my Teriyaki Tempeh, it brings back memories of Japanese meals with my family in Hawai’i at traditional Japanese grill restaurants. I’ve been to Japan twice, and while I didn’t eat a lot of tempeh dishes during those visits, I certainly ate a lot of tempeh during my visits to Malaysia and other places in South East Asia!
Combine chopped tempeh cubes and marinade ingredients in a large pot or frying pan. Mix well. Marinate (unheated) for 15–20 min. Mix and turn pieces and marinate another 15–20 min.
Bring pot (or pan) to low boil. Partially cover and simmer on low heat about 10 min. Stir and turn pieces. Continue to simmer on low, stirring infrequently, until liquid is mostly reduced, another 5–10 min.
Increase heat to medium and fry, stirring regularly, until cubes are browned and scorched, 5–10 min. Turn off heat, cover, and set aside.
stir-fried vegetables:
2 cups (150 g) broccoli chopped in small florets
1 large (120 g) carrot peeled, sliced
1 medium (180 g) red pepper chopped
1 Tbs sesame oil
3/4 cup (180 ml) water more as needed
1 Tbs soy sauce (shoyu)
1 Tbs corn starch
3–4 tsp sesame seeds roasted, for garnish
Heat sesame oil in large pot or wok on medium high heat.
Add chopped broccoli, carrots, and red pepper. Stir fry until vegetables start to soften, 4–6 min.
Add cooked, marinated tempeh to pot or wok of frying vegetables. Mix well. Fry 2–3 min, stirring regularly.
Whisk water, soy sauce, and corn starch in a bowl or measuring cup. Slowly pour mixture into frying vegetables and tempeh cubes, stirring constantly.
Simmer on medium heat, stirring constantly, until sauce has thickened, 3–5 min. Remove from heat.
Garnish with sesame seeds. Serve with short-grain brown rice or sushi rice.
Variations:
No Tempeh: Substitute chopped seitan or tofu cubes for tempeh.
Tempehwürfel und Marinade-Zutaten in einem großen Topf oder einer Pfanne gut vermischen. 15 bis 20 Min. marinieren (nicht erhitzen). Tempeh wenden und weitere 15 bis 20 Min. marinieren.
Auf niedriger Flamme zum Köcheln bringen, halb abdecken und circa 10 Min. auf niedriger Flamme köcheln. Tempehwürfel wenden, umrühren und weitere 5 bis 10 Min. köcheln, bis die Flüssigkeit größtenteils eingekocht ist.
Hitze erhöhen und Tempeh 5 bis 10 Min. schmoren, bis die Würfel gut gebräunt sind. Flamme abstellen, abdecken und beiseite stellen.
Gemüse:
2 Tassen (150 g) Brokkoli in kleine Röschen geschnitten
1 große (120 g) Möhre geschält, gehackt
1 mittelgroße (180 g) rote Paprika gehackt
1 EL Sesamöl
3/4 Tasse (180 ml) Wasser bei Bedarf mehr
1 EL Sojasoße (Shoyu)
1 EL Speisestärke
3–4 TL Sesamsamen geröstet, zum Garnieren
Sesamöl in einem Wok oder großem Topf auf mittlerer Flamme erhitzen.
Brokkoli, Möhre und Paprika hineingeben und 4 bis 6 Min. anbraten, bis das Gemüse weich wird.
Marinierten Tempeh zugeben und gut umrühren. 2 bis 3 Min. unter Rühren braten.
Wasser, Sojasoße und Stärke in einer Schüssel verrühren. Langsam unter Rühren in den Wok zum Gemüse und Tempeh geben.
3 bis 5 Min. auf mittlerer Flamme köcheln, bis die Soße eindickt. Vom Herd nehmen.
Mit Sesamsamen garnieren und mit Naturrundkorn- oder Sushi-Reis servieren
Variationen:
Ohne Tempeh: Statt Tempeh gehackten Seitan oder Tofuwürfel verwenden.
Got up at the call to worship. The muezzin’s electric voice singing through the alleys and into the open windows of my little room at Saint-Louis Sun Hotel. Cold shower and out the door. Abdou drove me to Gare Routiere Pompiers, an absolute circus of a station an hour’s urban safari from where we began.
It was a challenge, swimming in a sea of shouting drivers and riders intent on filling rundown Renaults and Peugeots for overland journeys to every corner of Senegal within a day’s drive. Eventually I found the vehicles bound for Banjul, The Gambia. Drank a sweet coffee at a makeshift stall while the driver tied a dozen bulky pieces of luggage to the roof with ropes. The engine doesn’t want to start, but then it does.
Thirty minutes on, our car grinds to a halt and dies. Now we’re on the side of the road in the already hot, still hectic outskirts of Dakar.
The driver says another Sept-Place will rescue us in an hour. Maybe two. Inshallah. So we’re all squatting in the shade in silence. Calm and unfazed. No one is anxious or angry. There is no rush. This happens all the time.
Ninety minutes later another battered Renault seven-seater taxi pulls up; Red dust swirls around us. Brief chatter. In no particular hurry we stand up, leisurely load up our new ride, climb into our busted seats and continue the six hour bumpy journey to the border.
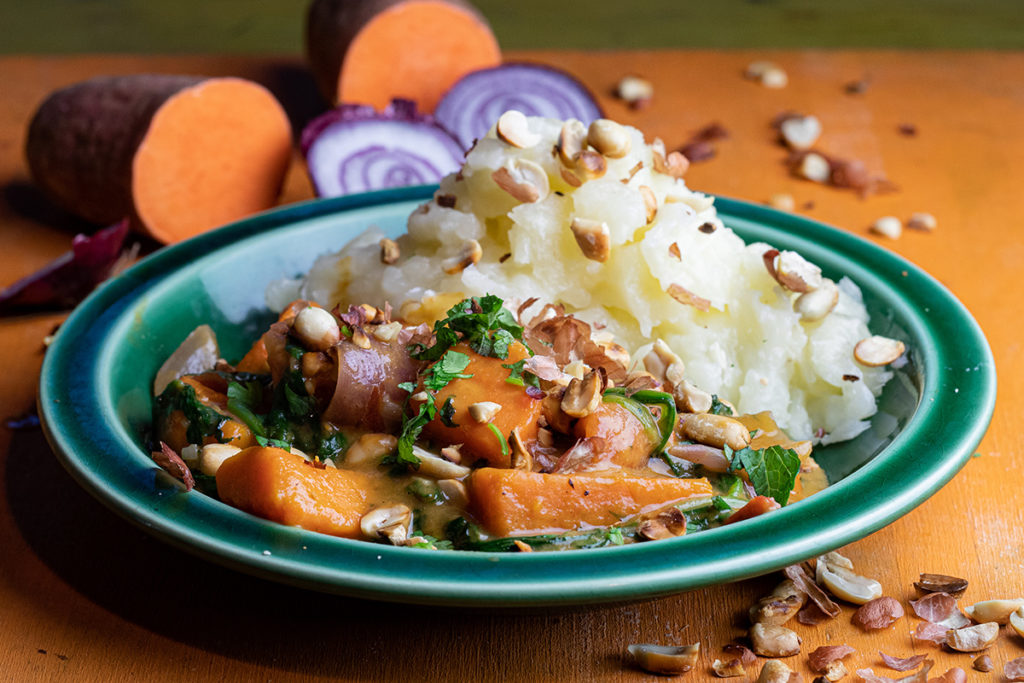
Plasas & Fufu Gambian spinach peanut stew with mashed cassava
3 Tbs peanut butter or peanuts lightly roasted, ground
1–2 Tbs tomato paste
2 tsp vegetable broth powder
1/2 tsp salt
3/4 cup (180 ml) water
1/4 cup (30 g) peanuts lightly roasted, for garnish
Heat 2 Tbs oil in large pot on medium heat.
Add chopped onion, garlic, and ground black pepper. Fry, stirring regularly, until aromatic. 2–3 min.
Add chopped sweet potato and tomatoes. Cook until tomatoes fall apart, 4–6 min, stirring regularly.
In a bowl or measuring cup, whisk peanut butter (or ground peanuts), tomato paste, vegetable broth powder, salt, and water. Stir into pot. Bring to low boil, reduce heat to medium low. Simmer partially covered, stirring occasionally, 10 min.
Stir in chopped spinach. Cover and steam 5–7 min, stirring occasionally, adding more water if needed. When the spinach is done, stir a few times and turn off heat.
Garnish with roasted peanuts. Serve with fufu or rice.
fufu (mashed cassava):
18 oz (500 g) cassava (also known as: manioc & yuca)peeled, chopped
1 Tbs margarine or vegetable oil
1 1/2 cup (360 ml) water more as needed
1/4 tsp salt
Bring 1 1/2 cup (360 ml) water to boil in large pot. Add chopped cassava.
Return to boil, reduce heat to low. Cover, steam until soft, stirring occasionally, about 20 min.
Remove from heat. Add margarine (or oil) and salt. Mix well. Let cool 5–10 min.
Blend or mash until mostly smooth with an immersion blender or potato masher until mostly smooth. Add water gradually, if needed. The consistency should be similar to thick, sticky mashed potatoes.
Siebensitzer Dakar, Senegal. 10/2009
Stehe mit dem Ruf zum Morgengebet auf. Die elektrisierende Stimme des Muezzins klingt durch die Straßen und findet ihren Weg durchs offene Fenster in mein kleines Zimmer im Saint-Louis Sun Hotel. Kalte Dusche und los. Abdou fährt mich zum Gare Routiere Pompiers, einem absolut chaotischen Bus- und Autosammelplatz, ungefähr eine Stunde Irrfahrt vom Hotel entfernt.
Nicht gerade einfach, sich durch das Meer an Menschen zu drängen und genau den richtigen laut rufenden Fahrer zu finden, der seinen rostlaubigen Renault oder Peugeot für eine bis zu einen Tag dauernde Überlandfahrt in einen bestimmten Winkel Senegals mit Passagieren vollpacken will. Irgendwann finde ich die Ecke, wo die Mitfahrgelegenheiten nach Banjul, Gambia, stehen. Schnell noch einen süßen Kaffee von einem klitzekleinen Stand runterkippen, während der Fahrer mindestens ein Dutzend unhandliche Gepäckstücke auf dem Dach festzurrt. Der Motor will erst nicht anspringen, erwacht dann aber doch zum Leben.
Dreißig Minuten später kommt unser umgebautes Vehikel zum Halten und streikt. Nun sitzen wir alle am Straßenrand, kurz hinter Dakar, wo es schon jetzt ziemlich heiß und ziemlich hektisch ist.
Laut Fahrer wird uns bald ein anderer Sept-Place aufsammeln. In einer Stunde. Vielleicht zwei. Inschallah. Also hocken wir uns in den Schatten. Alle um mich herum sind ruhig und gelassen, niemand irgendwie nervös oder wütend, niemand gehetzt. So etwas passiert ständig.
Neunzig Minuten später rollt ein anderer zerbeulter Siebensitzer-Renault an und wirbelt den roten Staub um uns auf. Ein kurzer Austausch, dann stehen alle auf, niemand in besonderer Eile. Gelassen wird unsere neue Mitfahrgelegenheit mit dem Gepäck beladen und alle klettern auf ihre durchgesessenen Sitze.
Weiter geht die noch sechsstündige Ruckelfahrt in Richtung Grenze.
Plasas & Fufu Gambischer Spinat-Erdnuss-Eintopf mit Maniok-Stampf
3 EL Erdnussbutter oder Erdnüsse leicht geröstet, gemahlen
1–2 EL Tomatenmark
2 TL Gemüsebrühpulver
1/2 TL Salz
3/4 Tasse (180 ml) Wasser
1/4 Tasse (30 g) Erdnüsse leicht geröstet, zum Garnieren
2 EL Öl in einem großen Topf auf mittlerer Flamme erhitzen.
Zwiebel, Knoblauch und schwarzen Pfeffer hineingeben. 2 bis 3 Min. unter regelmäßigem Rühren anschwitzen, bis es aromatisch duftet.
Süßkartoffel und Tomaten zugeben. 4 bis 6 Min. unter regelmäßigem Rühren braten, bis die Tomaten zerfallen.
Erdnussbutter oder gemahlene Erdnüsse, Tomatenmark, Gemüsebrühpulver, Salz und 3/4 Tasse (180 ml) Wasser in einer Schüssel verquirlen. In den Topf geben, umrühren und zum Kochen bringen. Flamme herunterstellen und den Eintopf 10 Min. unter gelegentlichem Rühren köcheln lassen.
Spinat einrühren, abdecken und 5 bis 7 Min. unter gelegentlichem Rühren dämpfen. Bei Bedarf etwas mehr Wasser einrühren. Wenn der Spinat gar ist, mehrmals umrühren und vom Herd nehmen.
Mit gerösteten Erdnüssen garnieren und mit Fufu oder Reis servieren.
Fufu (Maniok-Stampf):
500 g Maniok (bzw. Cassava oder Yuca) geschält, gehackt
1 EL Margarine oder Pflanzenöl
1 1/2 Tasse (360 ml) Wasser bei Bedarf mehr
1/4 TL Salz
1 1/2 Tassen (360 ml) Wasser in einem großen Topf zum Kochen bringen. Maniok hineingeben.
Erneut zum Kochen bringen, dann Flamme niedrig stellen. Abgedeckt circa 20 Min. unter gelegentlichem Rühren weich kochen.
Vom Herd nehmen. Margarine oder Öl und Salz hinzufügen. Gut umrühren und 5 bis 10 Min. abkühlen lassen.
Maniokstücke mit einem Pürierstab oder Kartoffelstampfer zu einem größtenteils glatten Stampf verarbeiten. Bei Bedarf nach und nach etwas Wasser zugeben. Die Konsistenz sollte einem dicken, klebrigen Kartoffelbrei ähneln.
This is my updated recipe for vegan Paneer Makhani, a north Indian classic and family favorite. This dish will always remind me of my first to trip to India in 2001, and all the back alley eateries in Delhi’s Pahar Ganj, the backpacker neighborhood– which still exists, and I’ve been back to literally dozens of times in the last two decades. On my last visit to Delhi and Pahar Ganj I think I did find one of the hole-in-the-wall restaurants from way back then, but you can never be sure. Through the dusty maze of winding alleys, it’s so easy to get lost… or unsure if a place is the same or different than one you saw an hour ago… or years ago!
For the original edition of The Lotus and the Artichoke – Vegan Recipes from World Adventures, my brother Adam asked me if I could make a vegan version of this one dish his family used to love at a local Indian restaurant in the New Jersey suburbs. I got to work and came up with a very decent interpretation of the classic dish, which is very heavy on cream and butter (hence the name, which basically translates to ‘Cheese Butter’ or ‘Cheesy Cream’!) But as with Indian naming conventions, this dish may be found with the names ‘Shahi Paneer‘ (which is what I remember from the Delhi Pahar Ganj menus), or in many parts of India,especially if cooked at home – Paneer Butter Masala, or just PBM. (This is what it was called in most places in Amravati, Maharashtra where I lived for a year – it often appears on menus in abbreviated form.) I’ve come to understand that Paneer Makhani is most commonly used outside of India, especially in restaurants.
Whatever you want to call it, this dish is hands-down a pleaser and a delicious curry to serve friends and families, it’s a hit with children of all ages, too. When making it for adults I’ll often dial up the spices and heat – you can just double the amount of ground cumin, coriander, Garam Masala spice mix (see my INDIA cookbook for my own homemade recipe), and red chili powder. I also love to add fresh (or dried) curry leaves, a bit of ground fenugreek (or methi – fenugreek leaves – at the end) and a black cardamom pod… for that delicious smokey flavor.
Instead of using dairy (cream and butter) I use blended cashews, which is very common in India, too, and used as a base in many creamy curries. And of course, I’m using my infamous tofu-paneer recipe, implementing lightly batter-fried tofu cubes instead of traditional paneer, or homemade cheese cubes.
Yeah, it’s me. India 2001.
Paneer Makhani North Indian creamy tomato sauce with tofu paneer
2 Tbs nutritional yeast flakes or chickpea flour (besan)
2 Tbs corn starch
2–3 Tbs coconut oil or vegetable oil
Cut tofu in slabs and wrap in a dish towel. Weight with a cutting board for 15–20 min to remove excess moisture. Unwrap and cut into triangles or cubes
Combine lemon juice, soy sauce, nutritional yeast flakes (or chickpea flour), and corn starch in bowl. Add tofu cubes, mix well, coat all pieces.
Heat oil in a small frying pan on medium high. Fry battered cubes evenly in batches until golden brown, turning regularly, 4–6 min. Remove, drain, set aside.
tomato cream curry:
2/3 cup (80 g) cashews
2 medium (180 g) tomatoes chopped
2 1/2 cups (600 ml) water
1 in (3 cm) fresh ginger finely chopped
2 cloves garlic finely chopped optional
2 Tbs vegetable oil
1 tsp black mustard seeds
4–6 curry leaves or 2 bay leaves
1 tsp coriander ground
1 tsp cumin ground
1 tsp Garam Masala
1/4 tsp asafoetida (hing) optional
2 Tbs tomato paste
1 tsp red chili powder or paprika ground
3/4 tsp turmeric ground
1 Tbs lemon juice
2 tsp sugar
1 1/4 tsp salt
fresh coriander leaves chopped, for garnish
Soak cashews in a bowl of boiling hot water for 30 min. Drain and discard water.
Blend chopped tomatoes with 1 1/4 cups (300 ml) water in a blender or food processor until smooth.
Heat oil in a large pot on medium heat. Add mustard seeds. After they start to pop (20–30 sec), add chopped garlic (if using), ginger, curryleaves or bay leaves, ground coriander, cumin, Garam Masala, and asafoetida (if using). Fry, stirring often, until richly aromatic, 2–3 min.
Stir in blended tomatoes. Bring to simmer and reduce to medium low heat. Cook, stirring often, until sauce is reduced and turns dark red, 10–15 min.
Blend soaked cashews with 1 1/4 cups (300 ml) water until smooth. Stir into simmering tomato sauce.
Stir in tomato paste, red chili powder (or paprika), turmeric, lemon juice, sugar, and salt. Return to simmer. Cook, stirring often, until sauce thickens and oil begins to separate, 5–8 min.
Stir in fried tofu cubes. Continue to simmer on low, stirring occasionally, 4–5 min. Remove from heat.
Garnish with chopped fresh coriander. Serve with basmati rice, chapati (roti), or naan.
Paneer Makhani Nordindisches cremiges Tomatencurry mit Tofu-Paneer
Tofu in dicke Scheiben schneiden, in ein sauberes Geschirrtuch wickeln und 15 bis 20 Min. mit einem Schneidebrett beschweren, um überschüssige Flüssigkeit herauszupressen. Auswickeln und in Dreiecke oder Würfel schneiden.
Zitronensaft, Sojasoße, Hefeflocken oder Kichererbsenmehl und Stärke in einer Rührschüssel verrühren. Tofuwürfel hinzufügen und mit der Mischung überziehen.
Öl in einer kleinen Pfanne auf mittlerer Flamme erhitzen. Mit Teig überzogene Würfel in mehreren Durchgängen 4 bis 6 Min. gleichmäßig goldbraun braten, dabei regelmäßig wenden. Aus der Pfanne nehmen, abtropfen lassen und beiseite stellen.
Cremiges Tomatencurry:
2/3 Tasse (80 g) Cashewkerne
2 mittelgroße (180 g) Tomaten gehackt
2 1/2 Tassen (600 ml) Wasser
3 cm frischer Ingwer fein gehackt
2 Knoblauchzehen fein gehackt wenn gewünscht
frisches Koriandergrün gehackt, zum Garnieren
2 EL Pflanzenöl
1 TL schwarze Senfsamen
4–6 Curry- oder 2 Lorbeerblätter
1 TL Koriander gemahlen
1 TL Kreuzkümmel gemahlen
1 TL Garam Masala
1/4 TL Asafoetida (Asant) wenn gewünscht
2 EL Tomatenmark
1 TL Chili- oder Paprikapulver
3/4 TL Kurkuma gemahlen
1 EL Zitronensaft
2 TL Zucker
1 1/4 TL Salz
Cashewkerne 30 Min. in einer Schüssel mit heißem Wasser einweichen. Abgießen und Einweichwasser wegschütten.
Tomaten mit 1 1/4 Tasse (300 ml) Wasser in einem Mixer oder einer Küchenmaschine glatt pürieren.
Öl in einem großen Topf auf mittlerer Flamme erhitzen. Senfsamen hineingeben. Nach deren Aufplatzen (20 bis 30 Sek.) Knoblauch (falls verwendet), Ingwer, Curry– oder Lorbeerblätter, Koriander, Kreuzkümmel, Garam Masala und Asafoetida (falls verwendet) zugeben. 2 bis 3 Min. unter Rühren anschwitzen, bis es aromatisch duftet.
Pürierte Tomaten einrühren und zum Köcheln bringen. Flamme herunterstellen und das Curry 10 bis 15 Min. unter häufigem Rühren köcheln lassen, bis die Soße reduziert und dunkelrot ist.
Eingeweichte Cashewkerne mit 1 1/4 Tasse (300 ml) Wasser glatt pürieren und in das köchelnde Curry rühren.
Tomatenmark, Chili– oder Paprikapulver, Kurkuma, Zitronensaft, Zucker und Salz einrühren. Erneut zum Köcheln bringen und unter häufigem Rühren 5 bis 8 Min. köcheln, bis die Soße eindickt und das Öl sich trennt.
Tofustücke unterheben. 4 bis 5 weitere Min. auf niedriger Flamme unter gelegentlichem Rühren köcheln. Vom Herd nehmen.
Mit gehacktem Koriandergrün garnieren und mit Basmati-Reis, Chapati (Roti) oder Naan servieren.
Cover poha rice flakes with water in a bowl. Soak 2 min and drain excess water. Set aside for now.
Heat oil in a large frying pan or wok on medium high heat. Add mustard seeds. After they start to pop (20–30 sec), add chopped onion, ginger, green chili, and curry leaves (if using), and ground cumin. Fry, stirring often, until richly aromatic and onions are browned, about 2–3 min.
Add chopped potatoes. Continue to cook, stirring often, until potatoes begin to soften, 5–7 min.
Stir in peanuts (or cashews). Continue to cook on medium heat until potatoes are soft, another 3–5 min.
Add soaked poha, peas, and chopped tomatoes, followed by ground turmeric, lime juice, sugar, and salt. Mix well, but gently so rice flakes don’t get mushy. Cook 2–3 min, stirring regularly. If needed, add 2–3 Tbs water and cover briefly to steam. Remove from heat. Cover and let sit 5 minutes.
Garnish withchopped fresh coriander. Serve with lime slices.
Variations:
Vedic: Replace onion with 1/4 tsp asafoetida (hing) and 1/4 tsp Garam Masala. Fruity: Add 2 Tbs golden raisins or chopped dates along with tomatoes. Coconut: Add 1–2 Tbs fresh grated coconut along with soaked poha in the last few minutes of cooking.
Poha-Flocken 2 Min. einer Schüssel mit Wasser einweichen. Abgießen, Einweichwasser wegschütten und beiseite stellen.
Öl in einer großen Pfanne oder einem Wok auf mittlerer Flamme erhitzen. Senfsamen hineingeben. Nach deren Aufplatzen (20 bis 30 Sek.) Zwiebel, Ingwer, Chilischote und Curryblätter (falls verwendet) sowie Kreuzkümmel hineingeben.
2 bis 3 Min. unter häufigem Rühren anschwitzen, bis es aromatisch duftet und die Zwiebel gebräunt ist.
Kartoffeln hinzufügen. 5 bis 7 Min. unter häufigem Rühren braten, bis die Kartoffeln weich werden.
Erdnüsse oder Cashewkerne einrühren. Weitere 3 bis 5 Min. auf mittlerer Flamme braten, bis die Kartoffeln richtig durch sind.
Eingeweichte Poha-Flocken, Erbsen und Tomaten hinzufügen. Gleich danach Kurkuma, Limettensaft, Zucker und Salz einrühren. Beim Umrühren darauf achten, dass die Reisflocken nicht breiig werden. 2 bis 3 weitere Min. unter Rühren braten. Bei Bedarf 2 bis 3 EL Wasser einrühren und Poha kurz abgedeckt etwas dämpfen. Vom Herd nehmen, abdecken und 5 Min. durchziehen lassen.
Mit frischem gehacktem Koriandergrün garnieren und mit Limettenspalten servieren.
Variationen:
Vedisch: Zwiebel mit 1/4 TL Asafoetida (Asant) und 1/4 TL Garam Masala ersetzen. Fruchtig: 2 EL Sultaninen oder gehackte Datteln zusammen mit den Tomaten zugeben. Kokos: In den letzten Kochminuten 1 bis 2 EL frische Kokosraspel unterrühren.